We will learn to analyse and clean up storage space in Dynamics 365 CE. Before we start, make sure to subscribe to CRM Crate so that you can stay up to date in the field of Power Platform.

How to find out the storage space in Dynamics 365?
Follow the below steps for analysing the storage in your Dataverse.
- Open the Power Platform Admin Center and navigate to Capacity as shown below.
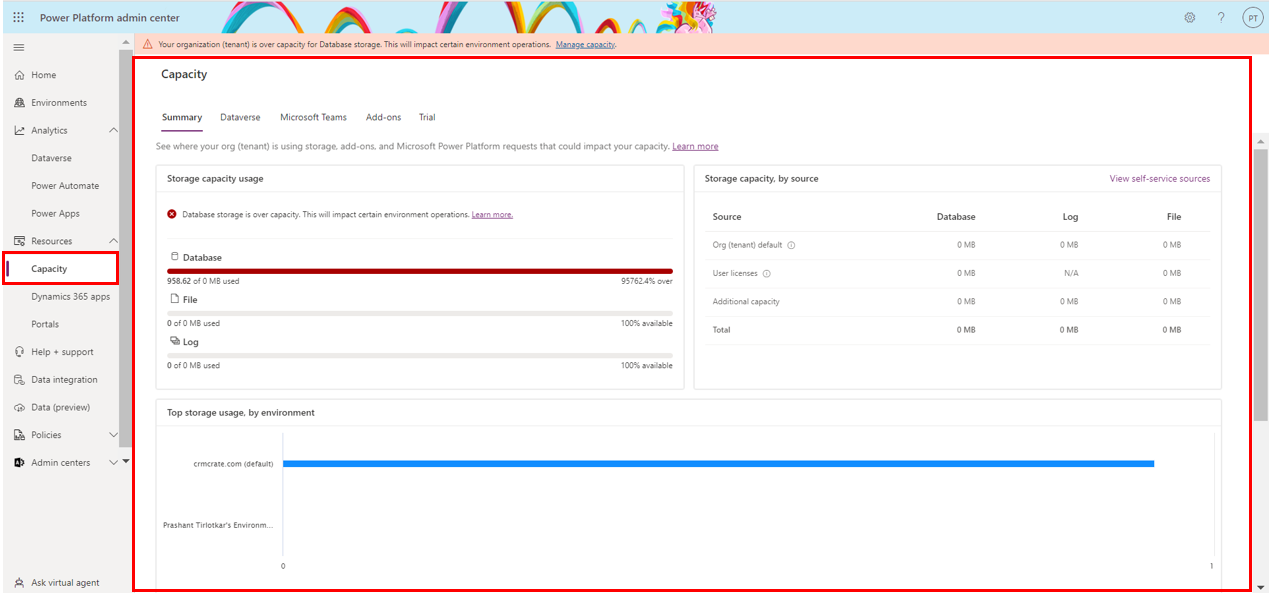
- There are three important insights provided in the summary page as given below.
Storage Capacity Usage
Used/Available capacity over the three areas: Database, File and Log storage. This is the total storage consumed/available across all of your Environment.
Top storage usage, by environment
This handy chart gives you an at-a-glance view of the storage being consumed by each environment. Simply hover over the coloured areas of the chart to be shown the type of storage being consumed and size in GB.
Storage capacity by source
A number of Power Platform licences include varying amounts of additional storage. This table shows your data capacity entitlements.
- Apart from the summary page, we can also view the in-depth storage details for each dedicated environment. Within the same Capacity page, navigate to the Dataverse tab as shown below.
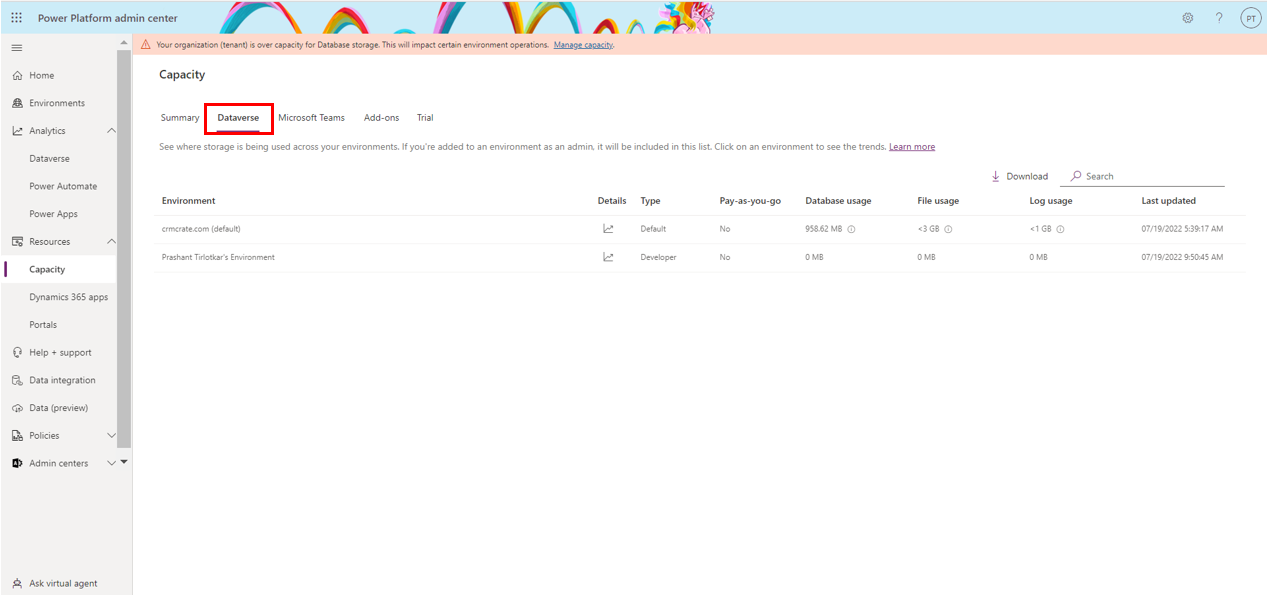
- Click on the chart button in-order to view the in-depth environment level details.
Cleaning up storage space in Dynamics 365 CE
Use the following methods to free up storage for each of the capacity types.
| Storage | Method |
| File | Method 3: Remove email attachments using Advanced Find Method 4: Remove email messages with attachments using a bulk deletion job Method 5: Remove notes with attachments using Advanced Find Method 6: Remove notes with attachments using a bulk deletion job |
| Log | Method 10: Delete audit logs Method 12: Delete plug-in trace logs using a bulk deletion job |
| Database | Method 1: Delete bulk email and workflow instances using a bulk deletion job Method 2: Evaluate and delete suspended workflows Method 7: Remove bulk duplicate detection jobs and associated copies of duplicate records Method 8: Delete bulk import instances using a bulk deletion job Method 9: Delete bulk deletion job instances using a bulk deletion job Method 11: Remove unrequired tables and columns from Dataverse search |
Method 1 : Delete bulk email and workflow instances using a bulk deletion job
Important Note – If you delete this data, you will no longer be able to tell if an email was sent through bulk email or if a workflow rule ran against a record. The emails that were sent and the actions that ran against the record in the workflow will remain.
- In the Power Platform admin center, select an environment. For Unified Interface, in the upper-right corner select Settings >> Advance Settings > Settings.
- Select Settings > Data management > Bulk deletion. In the menu bar, select New. This opens the Bulk Deletion Wizard.
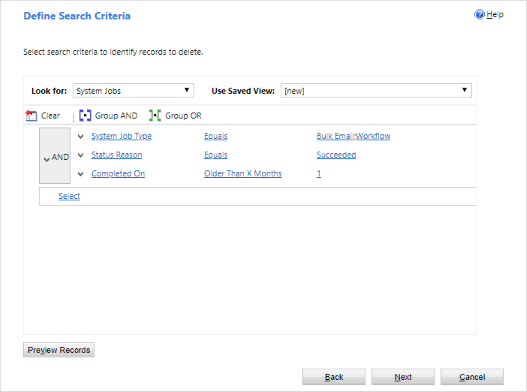
- Choose Next. In the Look for list, select System Jobs.
- In the search criteria area, add criteria similar to the following:
System Job Type – Equals – Bulk E-mail; Workflow;

Status Reason – Equals – Succeeded

Completed On – Older Than X Months – 1
- Group the three criteria rows:
- Choose the arrow next to each criteria row, and then choose Select Row.
- With all three rows selected, choose Group AND.
- Choose Next. In the Name text box, type a name for the bulk deletion job.
- Select a date and time for the job start time; preferably a time when users are not in customer engagement apps.
- Select the Run this job after every check box, and then in the days list, select the frequency you want the job to run.
- If you want a notification e-mail sent, select the Send an e-mail to me (email@domain.com) when this job is finished check box.

- Choose Next, review the bulk deletion job, and then choose Submit to create the recurring job.
Method 2 : Evaluate and delete suspended workflows
Sometimes workflows will enter a suspended state because there is a condition that will never be met or some other reason that will not allow the workflow to continue. This is one the effective method to clean storage space in Dynamics 365.
Important Note – Some workflows will be in a suspended state because they are waiting for a condition that has not yet been met, which is expected. For example, a workflow may be waiting for a task to be completed.
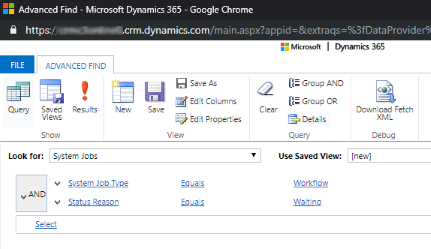
- In the upper-right corner, select Advanced Find.
- In the Look for list, select System Jobs.
- In the search criteria area, add criteria similar to the following:
System Job Type – Equals – Workflow

Status Reason – Equals – Waiting
- Group the two criteria rows:
- Choose the arrow next to each criteria row, and then choose Select Row.
- With both rows selected, choose Group AND.
- Choose Results. In the results window, you can open each item to determine whether the workflow can be deleted.
Method 3 : Remove email attachments using Advanced Find
Important Note: – If you delete this data, the attachments will no longer be available in customer engagement apps. However, if you have them saved in Office Outlook, they will still be there.
- In the upper-right corner, select Advanced Find.
- In the Look for list, select Email Messages.
- In the search criteria area, add criteria similar to the following:
Attachments (Item)

File Size (Bytes) – Is Greater Than - In the text box, type a byte value, such as 1,048,576 (this is binary for 1MB).
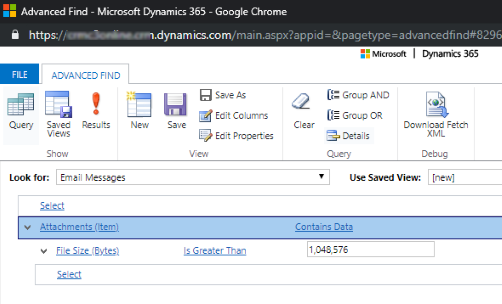
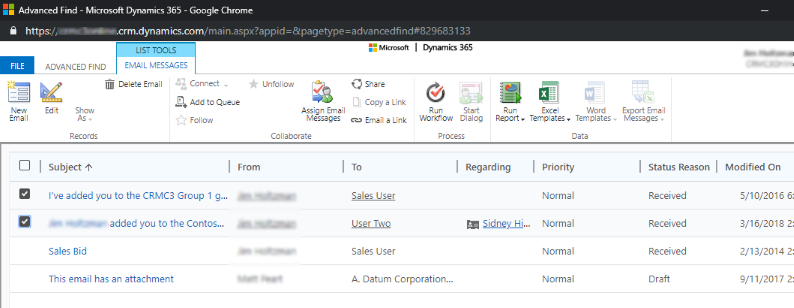
- Choose Results. You will now have a list of email messages that have attachments that are larger than ‘X’ bytes. Review the emails and delete the attachments as needed.
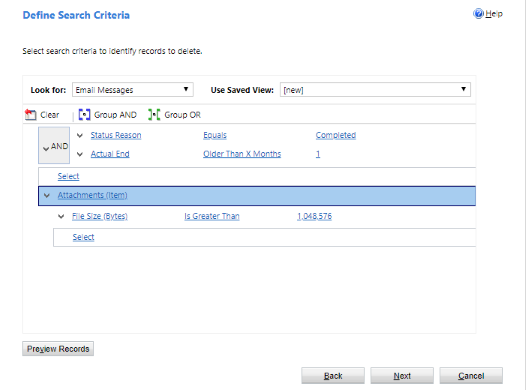
Method 4 : Remove email messages with attachments using a bulk deletion job
Important Note: If you delete this data, the email messages and their associated attachments will no longer be available in customer engagement apps. However, if you have them saved in Office Outlook, they will still be there.
- In the Power Platform admin center, select an environment.
- For Unified Interface, in the upper-right corner select Settings >> Advanced Settings > Settings.
- Select Settings > Data management > Bulk deletion. In the menu bar, select New. This opens the Bulk Deletion Wizard.
- Choose Next. In the Look for list, select Email Messages.
- In the search criteria area, add criteria similar to the following:
Status Reason – Equals – Sent or Received

Actual End – Older Than X Months – 1

Attachments (Item)

File Size (Bytes) – Is Greater Than – In the text box, type a byte value, such as 1,048,576 (this is binary for 1MB).
- Group the first two criteria rows:
- Choose the arrow next to each criteria row, and then choose Select Row.
- With both rows selected, choose Group AND.
- Choose Next. In the Name text box, type a name for the bulk deletion job.
- Select a date and time for the job start time; preferably a time when users are not in customer engagement apps.
- Select the Run this job after every check box, and then in the days list, select the frequency you want the job to run.
- If you want a notification e-mail sent, select the Send an email to me (email@domain.com) when this job is finished check box.

- Choose Next, review the bulk deletion job, and then choose Submit to create the recurring job.
Method 5 : Remove notes with attachments using Advanced Find
Important Note – If you delete this data, notes and their associated attachments will no longer be available in customer engagement apps.
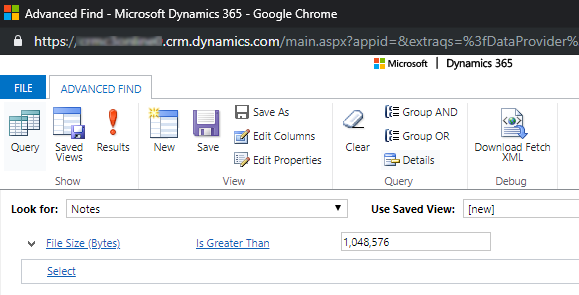
- In the upper-right corner, select Advanced Find.
- In the Look for list, select Notes.
- In the search criteria area, add criteria similar to the following:
File Size (Bytes) – Is Greater Than – In the text box, type a byte value, such as 1048576.
- Choose Results. You will now have a list of attachments that are larger than the size you specified.
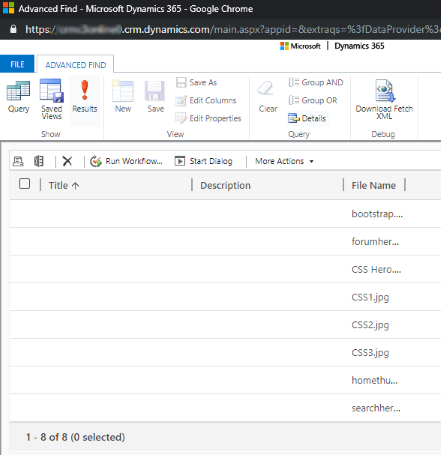
- Select individual or a multiple attachments, and then choose Delete (X).
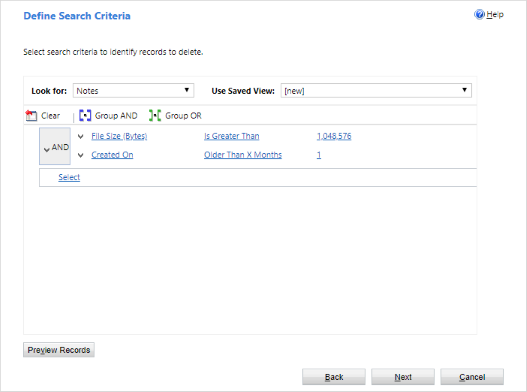
Method 6 : Remove notes with attachments using a bulk deletion job
Important Note – If you delete this data, notes and their associated attachments will no longer be available in customer engagement apps.
- In the Power Platform admin center, select an environment.
- For Unified Interface, in the upper-right corner select Settings >> Advanced Settings > Settings.
- Select Settings > Data management > Bulk deletion. In the menu bar, select New. This opens the Bulk Deletion Wizard.
- Choose Next. In the Look for list, select Notes.
- In the search criteria area, add criteria similar to the following:
File Size (Bytes) – Is Greater Than – In the text box, type a byte value, such as 1048576.

Created On – Older Than X Months – 1
- Group the two criteria rows:
- Choose the arrow next to each criteria row, and then choose Select Row.
- With all three rows selected, choose Group AND.
- Choose Next. In the Name text box, type a name for the bulk deletion job.
- Select a date and time for the job start time; preferably a time when users are not in customer engagement apps.
- Select the Run this job after every check box, and then in the days list, select the frequency you want the job to run.
- If you want a notification e-mail sent, select the Send an email to me (email@domain.com) when this job is finished check box.

- Choose Next, review the bulk deletion job, and then choose Submit to create the recurring job.
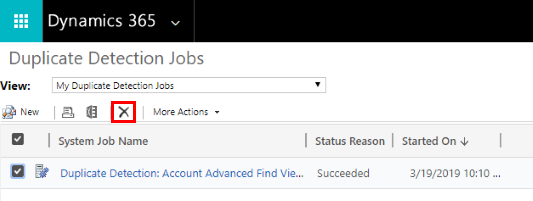
Method 7 : Remove bulk duplicate detection jobs and associated copies of duplicate records
Every time that a duplicate detection job runs, a copy of each duplicate record is stored in the database as part of the duplicate detection job. For example, if you have 100 duplicate records, every time that you run a duplicate detection job that finds these duplicates, whether it is manual or reoccurring, those 100 duplicate records will be stored in the database under that instance of that duplicate job until the duplicates are merged or deleted, or until the instance of that duplicate detection job is deleted. This is one the effective method to clean storage space in Dynamics 365.
- In the Power Platform admin center, select an environment.
- For Unified Interface, in the upper-right corner select Settings >> Advanced Settings > Settings.
- Select Settings > Data management > Duplicate Detection Jobs. Select the duplicate detection job instances you want to delete and then choose Delete (X). To avoid wasting storage space, make sure duplicates are resolved promptly so that they are not reported in multiple duplicate detection jobs.
Method 8 : Delete bulk import instances using a bulk deletion job
Every time you perform a bulk import, there is a system job associated with that import. The system job details show which records imported successfully and which records failed.
Important Note – After you delete these bulk import jobs, you will not be able to see what data was imported and you cannot roll back the import.
- In the Power Platform admin center, select an environment.
- For Unified Interface, in the upper-right corner select Settings >> Advanced Settings > Settings.
- Select Settings > Data management > Bulk deletion. In the menu bar, select New. This opens the Bulk Deletion Wizard.
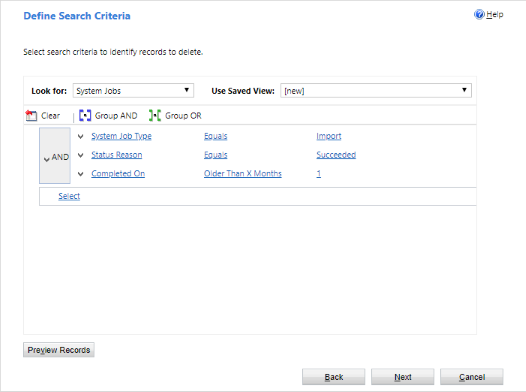
- Choose Next. In the Look for list, select System Jobs.
- In the search criteria area, add criteria similar to the following:
System Job Type – Equals – Import

Status Reason – Equals – Succeeded

Completed On – Older Than X Months – 1
- Group the three criteria rows:
- Choose the arrow next to each criteria row, and then choose Select Row.
- With all three rows selected, choose Group AND.
- Choose Next. In the Name text box, type a name for the bulk deletion job.
- Select a date and time for the job start time; preferably a time when users are not in customer engagement apps.
- Select the Run this job after every check box, and then in the days list, select the frequency you want the job to run.
- If you want a notification e-mail sent, select the Send an email to me (email@domain.com) when this job is finished check box.

- Choose Next, review the bulk deletion job, and then choose Submit to create the recurring job.
Method 9 : Delete bulk import instances using a bulk deletion job
When you are bulk deleting data, such as in many of the methods described in this article, a bulk deletion system job is created and can be deleted.
Important Note – After you delete these jobs, you will lose the history of the prior bulk deletion jobs that you’ve run.
- In the Power Platform admin center, select an environment.
- For Unified Interface, in the upper-right corner select Settings >> Advanced Settings > Settings.
- Select Settings > Data management > Bulk deletion. In the menu bar, select New. This opens the Bulk Deletion Wizard.
- Choose Next. In the Look for list, select System Jobs.
- In the search criteria area, add criteria similar to the following:
System Job Type – Equals – Bulk Delete

Status Reason – Equals – Succeeded

Completed On – Older Than X Months – 1
- Group the three criteria rows:
- Choose the arrow next to each criteria row, and then choose Select Row.
- With all three rows selected, choose Group AND.

- Choose Next. In the Name text box, type a name for the bulk deletion job.
- Select a date and time for the job start time; preferably a time when users are not in customer engagement apps.
- Select the Run this job after every check box, and then in the days list, select the frequency you want the job to run.
- If you want a notification e-mail sent, select the Send an email to me (email@domain.com) when this job is finished check box.

- Choose Next, review the bulk deletion job, and then choose Submit to create the recurring job.
Method 10 : Delete audit logs – legacy process
When you enable auditing, customer engagement apps create audit logs to store the audit history of the records. You can delete these audit logs to free space when they are no longer needed.
Important Note – When you delete an audit log, you can no longer view the audit history for the period covered by that audit log.
- In the upper-right corner of an app, select Settings >> Advanced Settings > Settings > Auditing.
- In the Audit area choose Audit Log Management.
- Select the oldest audit log, then choose Delete Logs.
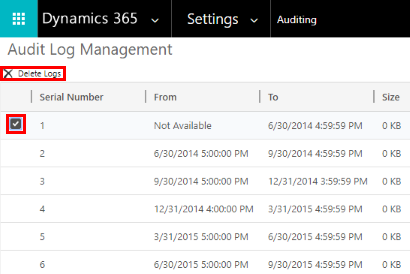
- In the confirmation message choose OK.
- Note – You can only delete the oldest audit log in the system. To delete more than one audit log repeat deleting the oldest available audit log until you have deleted enough logs.
Method 10 : Delete audit logs – new process
Microsoft is migrating audit logs to a new storage location. Environments whose data migration is complete can use the new audit delete experience. When you enable auditing, customer engagement apps create audit logs to store the audit history of the records. You can delete these audit logs to free space when they are no longer needed.
Important Note – When you delete an audit log, you can no longer view the audit history for the period covered by that audit log.
- Sign in to the Power Platform admin center, and then select an environment.
- Under Auditing, select Delete logs.
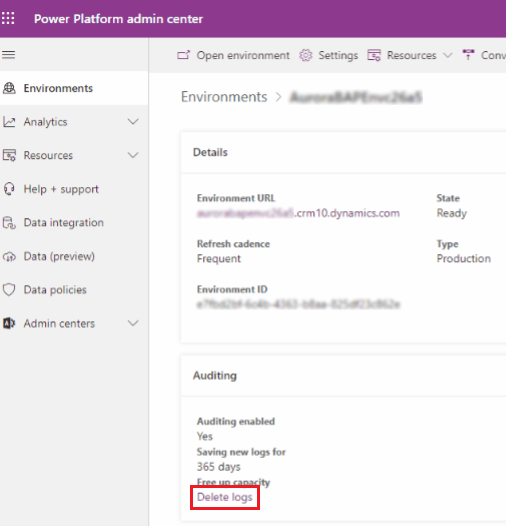
- Delete audit logs to free up log storage capacity for the selected environment.
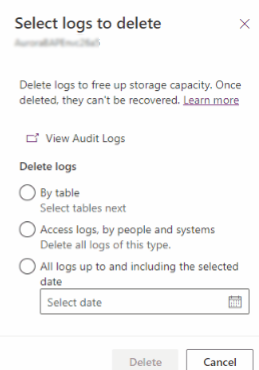
| Setting | Description | System job name |
|---|---|---|
| Delete logs by table | Select one or more tables for which you want to delete audit logs. By default all tables in the environment will be shown, whether they contain audit data or not. | Delete logs for [number of] tables. |
| Delete access logs by people and systems | Delete all access logs. This will delete all logs for all users and systems. | Delete access logs. |
| Delete all logs up to and including the selected date | Delete logs including the date selected. | Delete all logs before and including [timestamp]. |
- Select Delete, and then confirm the deletions.
- All data will be deleted in an asynchronous background system job.
Method 11 : Remove unrequired tables and columns from Dataverse search
Tables and tables fields enabled for Dataverse search have an impact on the database storage capacity. You can delete unrequired entities /tables and their columns from the dataverse as per your requirement.
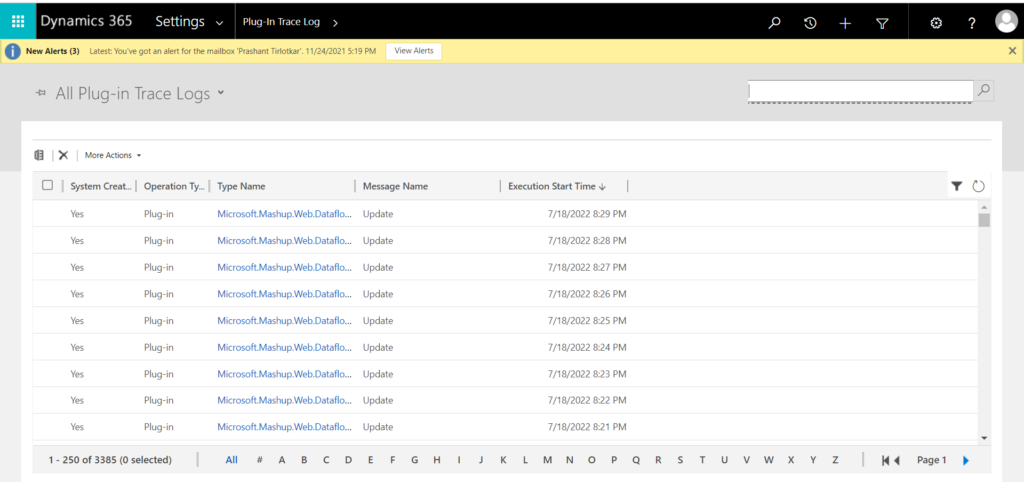
Method 12: Delete plug-in trace logs using a bulk deletion job
Deleting plugin trace logs is a recommended habit for Dynamics 365 CE makers & developers. Navigate to Advance Settings >> Plugin >> Customizations >> Plug-In Trace Log and delete the tracelogs as per your requirement.