We will acquire the skills to build automated solution deployment with Pipelines in Power Platform. Before we start, make sure to subscribe to CRM Crate so that you can stay up to date in the field of Power Platform.
Pipelines within the Power Platform are designed to make application lifecycle management (ALM) more accessible for Power Platform and Dynamics 365 customers. They achieve this by integrating ALM automation and enabling continuous integration and continuous delivery (CI/CD) capabilities within the service, making it more user-friendly for all creators, administrators, and developers.
Pipelines notably decrease the level of effort and specialized knowledge that was previously needed to achieve a return on investment (ROI) when implementing effective, automated ALM practices within your team or organization.
Below are few key benefits of deploying your solutions through Power Platform Pipelines.
- Experienced developers have the choice to expand pipelines and execute them through the Power Platform command line interface (CLI).
- System Administrators can swiftly set up automated deployment pipelines within a matter of minutes, as opposed to the lengthier timeframe of days or weeks.
- Application makers enjoy a user-friendly experience that makes deploying their solutions a straightforward process.
- Pipelines greatly enhance the productivity of makers, developers, and administrators. They expedite the delivery of your business solutions with improved quality, all while ensuring a secure and well-regulated process.
- Pipelines save time by taking care of the complex tasks and ongoing maintenance, relieving you from those responsibilities.
Licenses & Configurations required for using Pipelines
- All Power Platform environments used in pipelines must be enabled as Managed Environments.
- The pipelines host should function as a production environment, but it doesn’t necessarily need to be a Managed Environment.
- All Managed Environments require licenses that provide premium usage rights.
- Developer environments aren’t required to be Managed Environments. They can be used for development and testing with the developer plan.
Below is the sample pipeline setup suggest by Microsoft.
| Environment purpose | Environment type | Standalone license required |
|---|---|---|
| Host | Production | No |
| Development | Developer | No |
| QA | Developer | No |
| Production | Production | Yes |
Build & setup your Pipeline in Power Platform
Power Platform administrators have the capability to generate one or multiple pipelines, link them with numerous environments, and subsequently grant access to individuals responsible for pipeline administration or execution.
Below are the prerequisites for setting up your pipelines in Power Platform.
- While it’s advised to have at least four environments, you can still create a pipeline using as few as three Power Platform environments.
- Every environment utilized in pipelines must be equipped with a Microsoft Dataverse database.
- For a pipeline, it’s essential that all the destination environments are set as Managed Environments.
- To install the pipelines application, you are required to possess either a Power Platform administrator or Dataverse system administrator role.
Select Power Platform environments for pipelines
Prior to starting, it is essential to choose the environments that will be involved in the pipelines. Make sure to activate all desired target environments as Managed Environments (Note: – Managed Environments are not necessary for the pipelines’ host or developer environments).
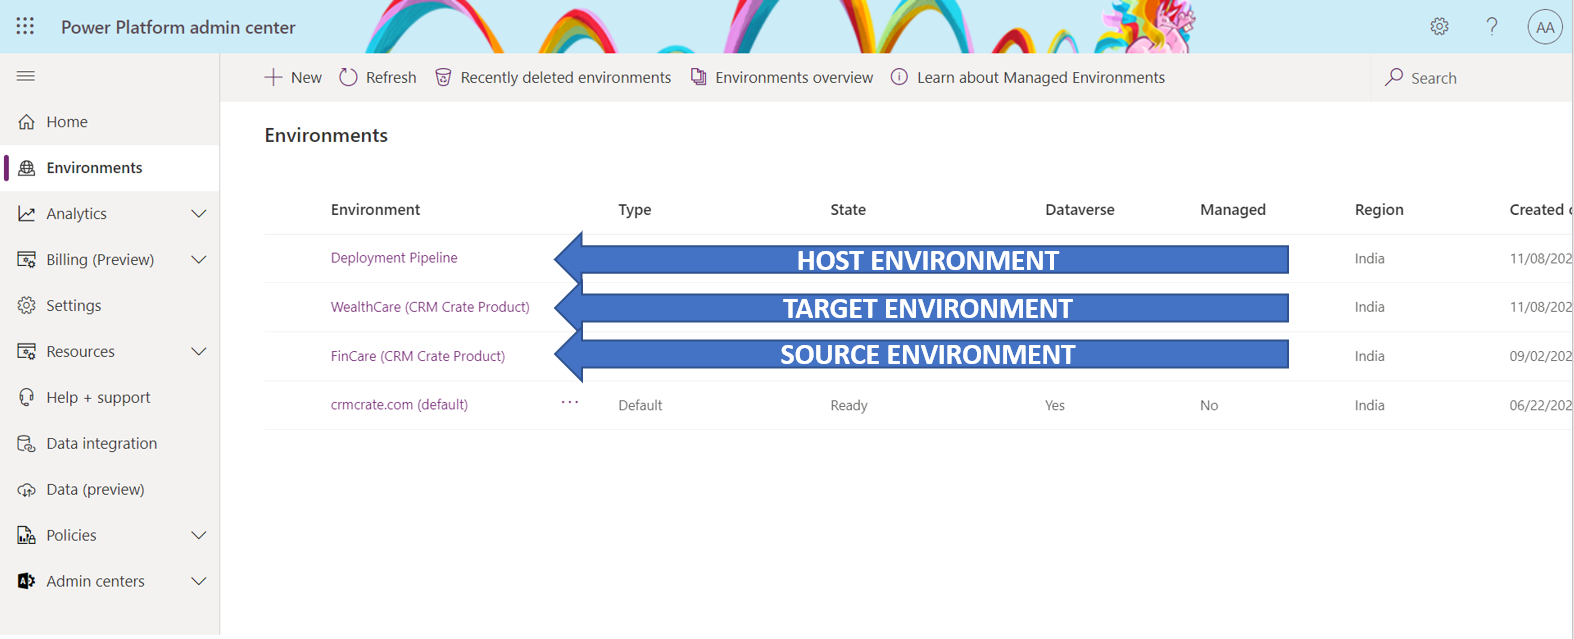
Power Platform Host environment
1. This specialized environment serves as the storage and control center for all aspects of pipeline configuration, security, and run history.
2. We advise maintaining this environment as a distinct production environment separate from the development and target environments.
3. f preferred, it’s possible to set up multiple hosts within a tenant, allowing for separate management of pipelines for various business organizations or geographic locations. Alternatively, having a single host for the entire tenant is also acceptable, provided that all environments are located in the same geographic area.
Important Note: – Deleting the host environment results in the removal of all pipelines and run data. It is crucial to exercise caution and fully comprehend the consequences of data and configuration loss, as well as the impact on access to pipelines created in the environment.
Power Platform Development environment
This is the environment in which you will create solutions. A pipeline can be executed from any connected development environment.
Power Platform Target environment.
The target environment(s) to which a pipeline deploys, such as integration testing, UAT, Production, and so on.
Set up the pipelines application in your host environment
- Access the Power Platform admin center, navigate to Environments, select “New,” and generate a new environment with a Dataverse database. Make certain to select the same region as the one used for your development, QA, and production environments.
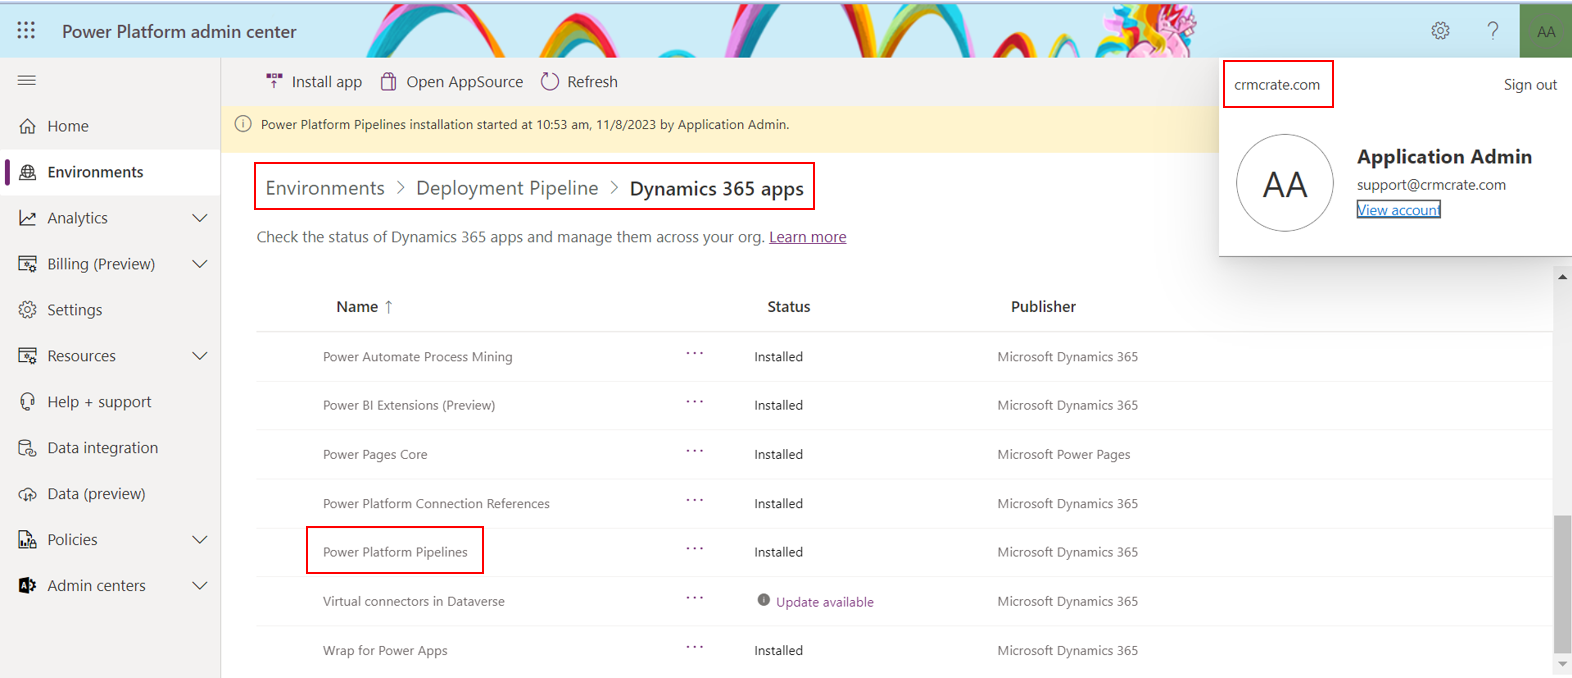
- Install the Power Platform Pipelines application in your host environment by choosing the host environment and then clicking on “Resources” followed by “Dynamics 365 apps.”
- Choose the “Install app” option and scroll down on the right-side panel & find ‘Power Platform Pipelines’.
- Select Next, if you agree, accept the terms, and then select Install.
- Once installed, the deployment pipelines configuration application will appear in the list of installed apps.
Set up a deployment pipeline
Follow the below steps for configuring deployment pipeline in your host application.
Step 1: Launch Deployment Pipeline Configuration app.
- In Power Platform Administrator, copy the environment IDs for all development and target Managed Environments that will be connected to pipelines, as you will need these in the below steps.
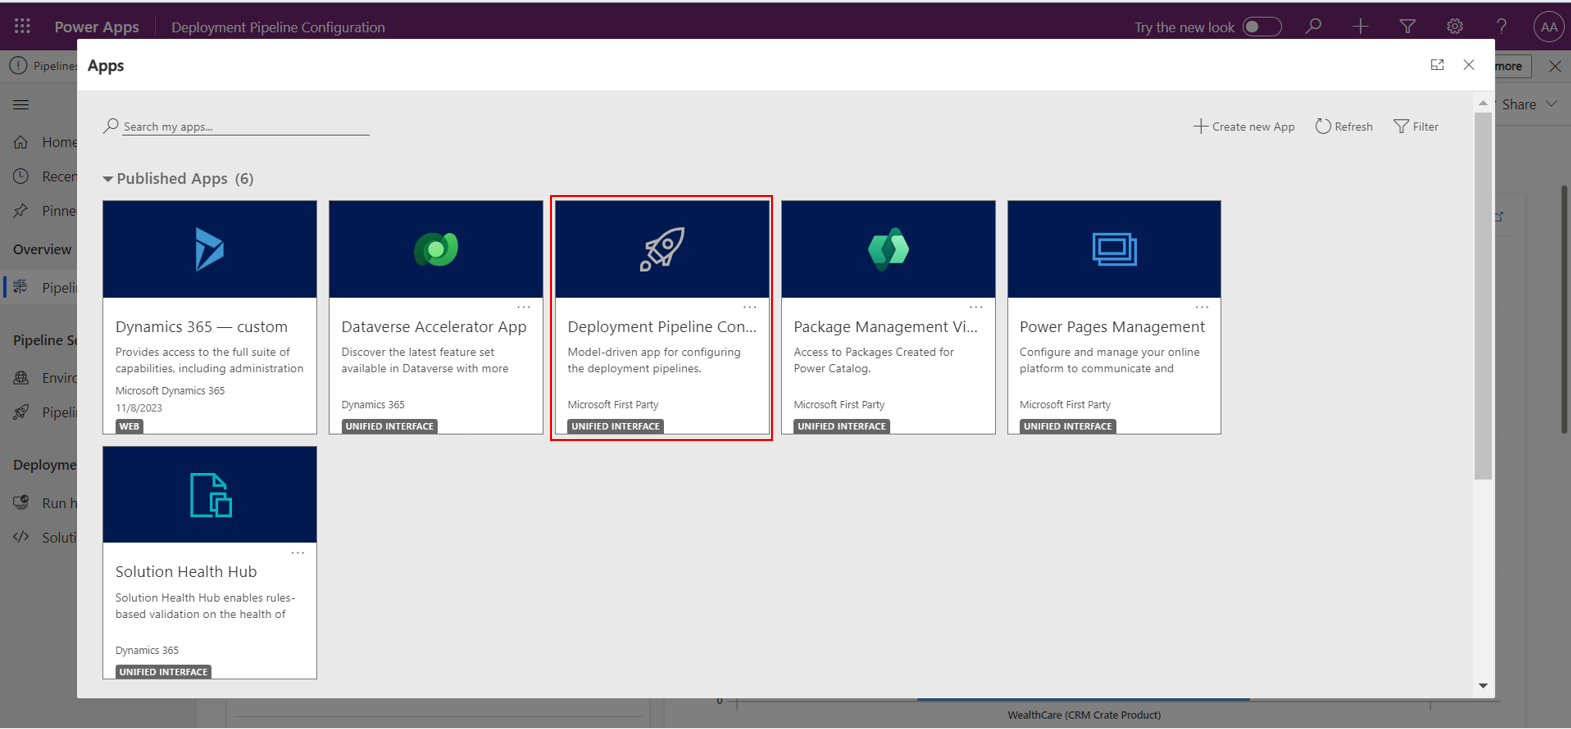
- Select your Host Application and click on ‘Open’.
- Play the Deployment Pipeline Configuration app.
Step 2: Configure source & target environments
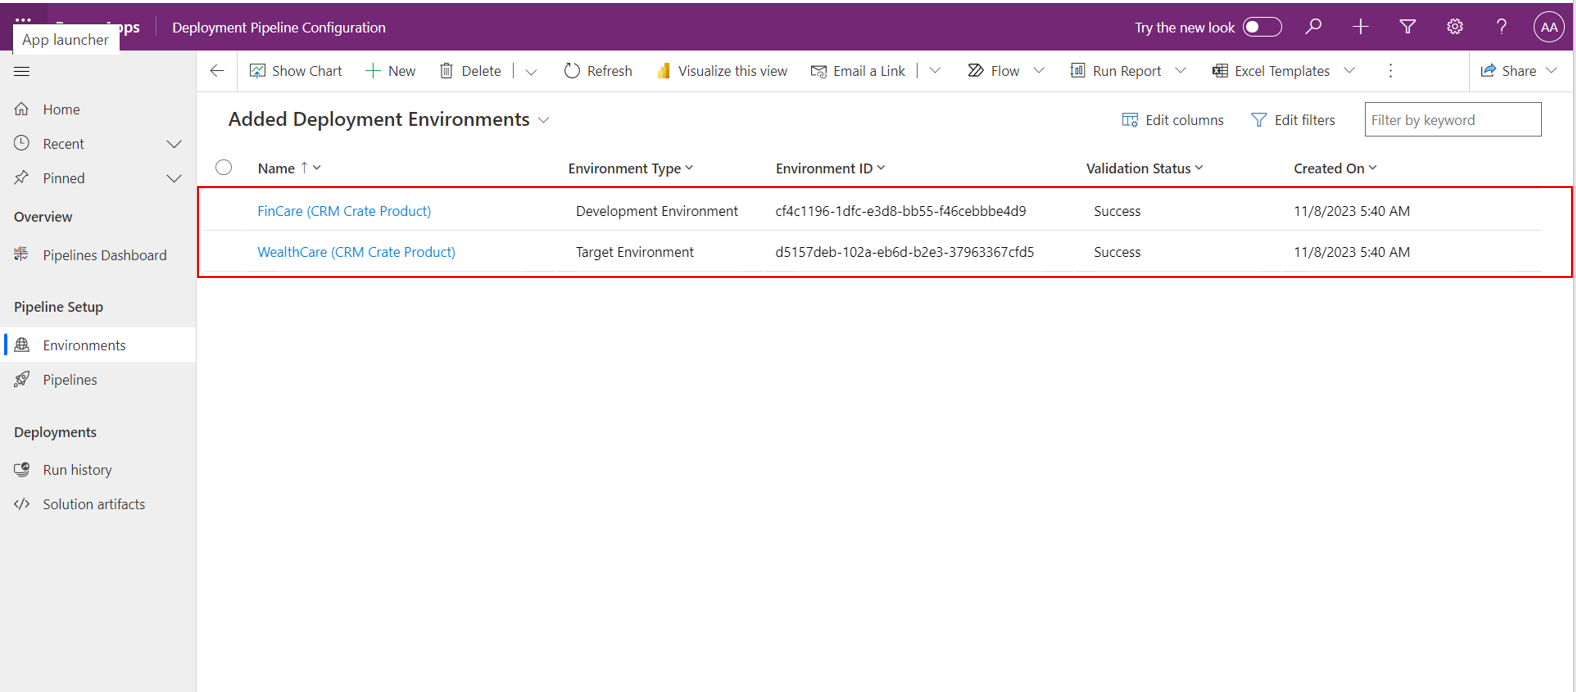
- In the left pane, click on “Environments,” and then choose “New” to create the environment row in Dataverse.
- Name: Provide the name for the environment record, and it’s advisable to use the same name as the actual environment, such as “FinCare (CRM Crate Product)“.
- Environment Type: Choose between the development or source environment and target environment options. Opt-in for the development environment when working on unmanaged solutions in source environments. Select the target environment when deploying managed solution artifacts in QA / production environments.
- Environment ID / GUID: Click on the given link to find your environment ID (https://learn.microsoft.com/en-us/power-platform/admin/determine-org-id-name#find-your-environment-and-organization-id).
- Save & Validate Status: Select ‘Save’ & refresh the form to verify validations Status equals ‘Success’.
Configure all your target & source environments as per the above given configuration.
Step 3: Configure pipelines for deployment
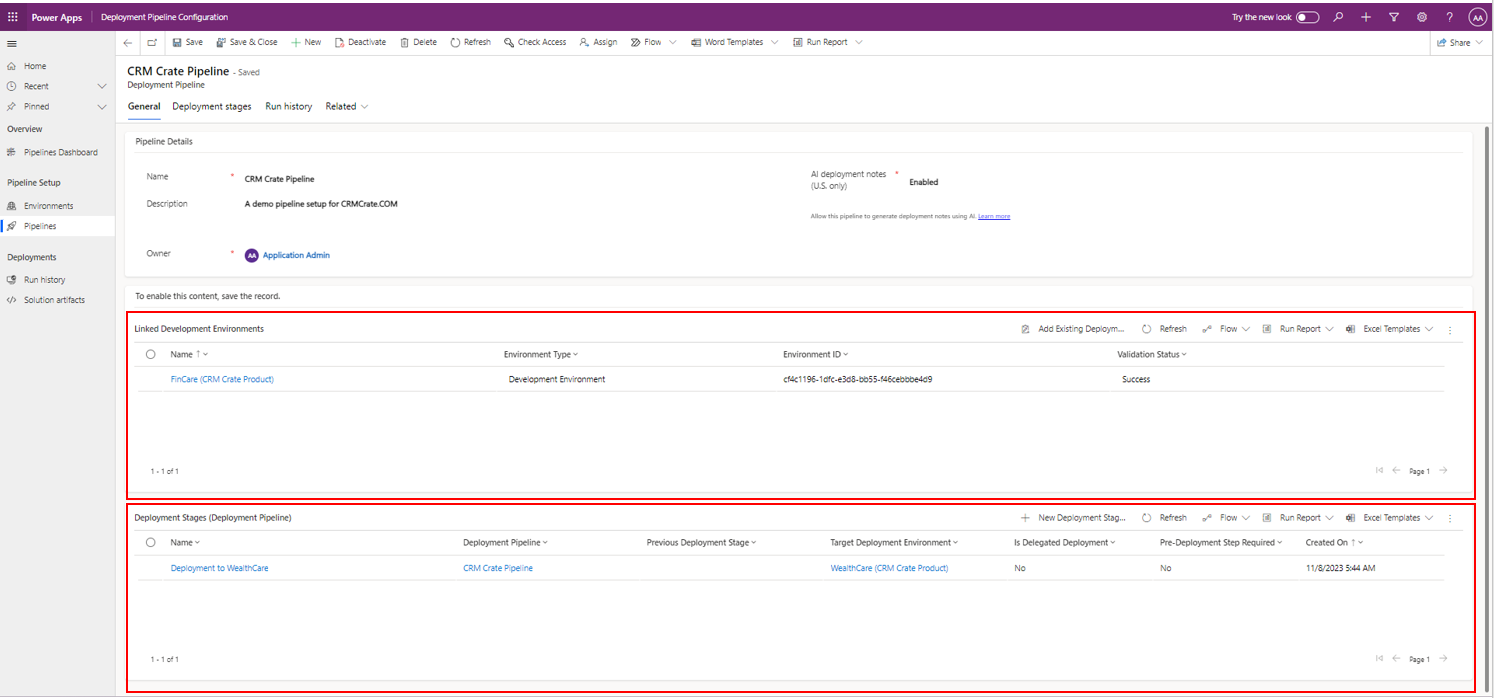
- Select ‘Pipelines’ on the left navigation pane, and then select New to create a new deployment pipeline.
- Name: Enter a name for the pipeline, such as ‘CRM Crate Pipeline’.
- Description: It is optional to enter a description for your pipeline.
- Save the form after entering the above basic details.
- Link Development Environment: In the Linked Development Environments sub-grid, click on ‘Add Existing Development Environment’ and link one or more development environments. Keep in mind that in order to execute a pipeline, it is essential to have at least one development environment and one stage associated with it.
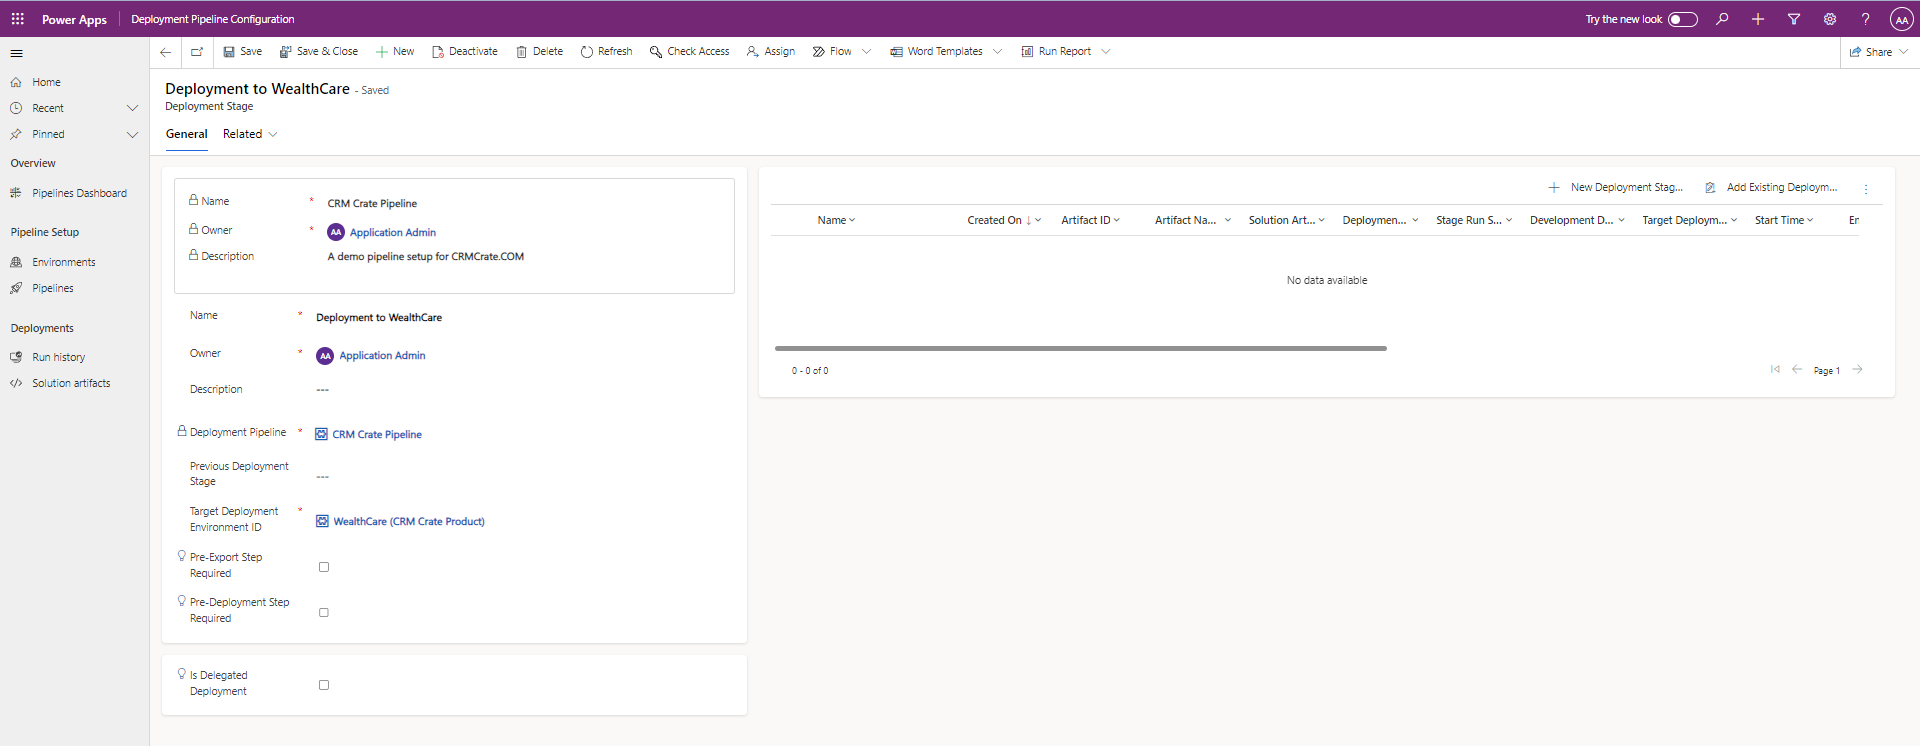
- Deployment Stages: Create a new deployment stage within the deployment stage sub-grid.
a. Name: The name of the stage.
b. Description: Optional description for the stage.
c. Previous Deployment Stage : Designate a deployment stage that needs to be deployed prior to deploying to the current stage. For instance, when setting up a production stage, you can specify the test or UAT stage as the ‘Previous Deployment Stage.’ It’s important to note that for the initial stage or for pipelines that consist of only one stage, this field should remain empty.
d. Target Deployment Environment: This is the target environment where this stage will deploy to.
e. PreDeployment Step Required: Deployment requests will be pending until approved via custom business logic. Requires additional configuration.
f. Pre-export Step Required: This steps allows running custom validation logic when a deployment request is submitted. Pipelines won’t export the solution from a development environment until this step is marked as completed. Only enable this for the first stage in a pipeline.
g. Is Delegated Deployment: This step carries out deployments using a service principal or pipeline stage owner’s identity instead of the requesting maker’s. This ensures makers can request deployments without elevated (or any) access within target environments. Requires approval from an authorized identity.
Each step of a pipeline deployment triggers a real-time event at the beginning and completion of the step for which you can initiate custom logic. Additional triggers are produced when gated extensions are enabled. These correspond to the custom step inserted when an extension is enabled on the pipeline stage.
| Stage Gated extension | Step started trigger | Step completed trigger | Unbound action | Connection to use |
|---|---|---|---|---|
| Pre-export step required | OnDeploymentRequested | N/A | UpdatePreExportStepStatus | Any identity with access to update the deployment stage run record |
| Is delegated deployment | OnApprovalStarted | OnDeploymentCompleted | Create a connection as the service principal or or pipeline stage owner as configured on the pipeline stage. The pipeline stage owner must be an owner of the service principal in Microsoft Azure Active Directory. | |
| Pre-deployment step required | OnPreDeploymentStarted | OnPreDeploymentCompleted | UpdatePreDeploymentStepStatus | Any identity with access to update the deployment stage run record |
Run pipelines in Power Platform
Pipelines streamline the deployment of solutions across different Power Platform environments and promote effective application management practices with minimal manual intervention.
Follow the below steps to import solutions through pipelines in Power Platform.
- Log in to a Power Platform environment through Power Apps (make.powerapps.com) or Power Automate (make.powerautomate.com) and choose your development environment.
- To utilize a pipeline for deploying a solution, navigate to the Solutions section and either create a new unmanaged solution or select an existing one for deployment.
- Within the Solutions section, select one of the two provided options to incorporate the solution into the pipeline, as described below.
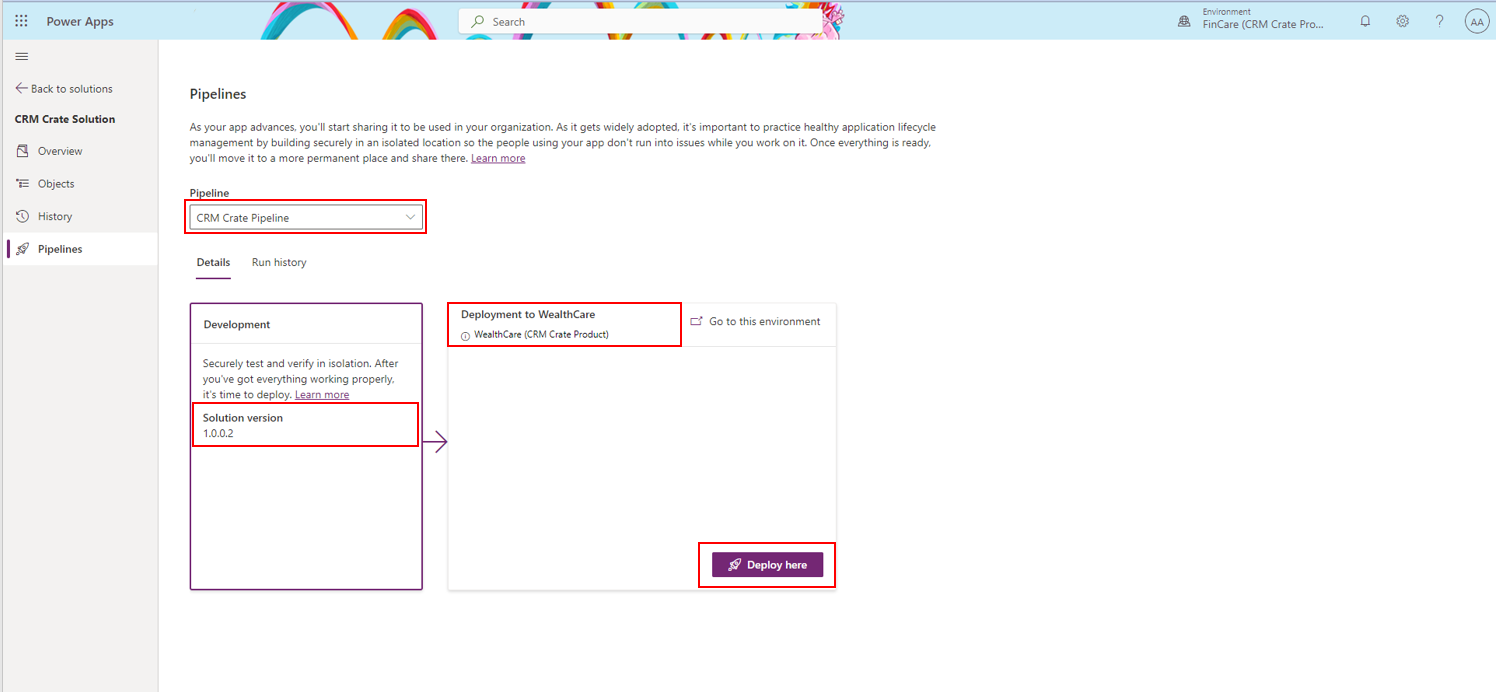
a. Select Pipelines from the left navigation pane.
b. Select Overview from the left navigation pane, and then select Deploy on the command bar. - Choose the deployment target stage, such as “Deploy to Test,” then click “Deploy here.” This action will trigger the deployment pane to appear on the right.
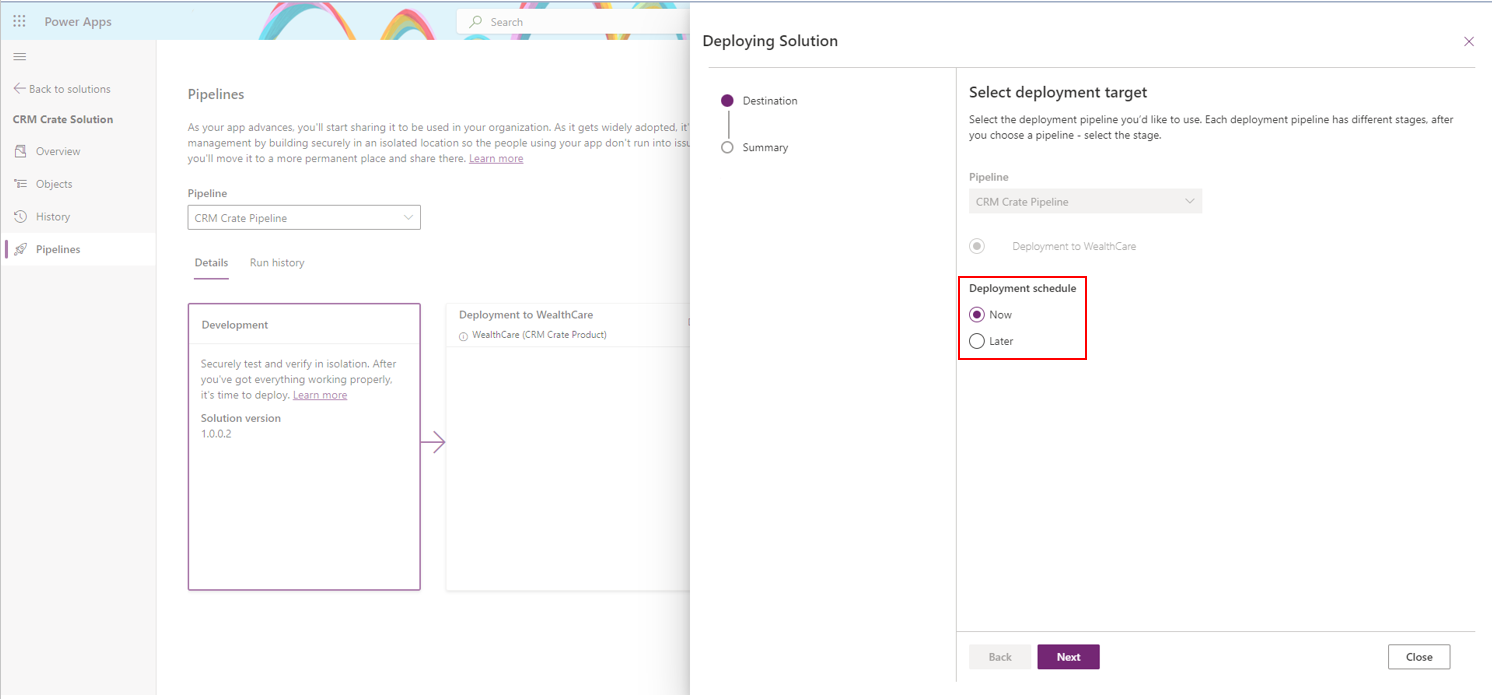
- Opt-in for immediate deployment by selecting ‘Deploy Now’ or set a later schedule by selecting ‘Schedule for later’, then click on “Next” in the right-hand panel. This action triggers the validation of the solution against the test environment, a process commonly known as preflight checks. During this validation, the system examines for missing dependencies and other typical issues that could potentially lead to a deployment failure.
- Review the summary of your deployment and optionally add deployment notes for future reference purpose.
- Choose “Deploy.” This action triggers an automated deployment to the designated target environment.
Important Notes
1. The deployment stages must be completed sequentially. For instance, you cannot deploy version 1.0.0.1 to the production environment until it has been successfully deployed to the testing environment. After the successful deployment to the testing environment, the same solution that was originally deployed will be subsequently deployed to the production environment, even if you have made modifications to the solution without incrementing its version number.
2. Power Platform Pipelines aren’t visible within the default solution, managed solutions, or target environments.
Monitor pipeline deployments in Power Platform
The Pipelines page within the Solutions section provides a comprehensive view of all deployment activities pertaining to the current pipeline and solution.
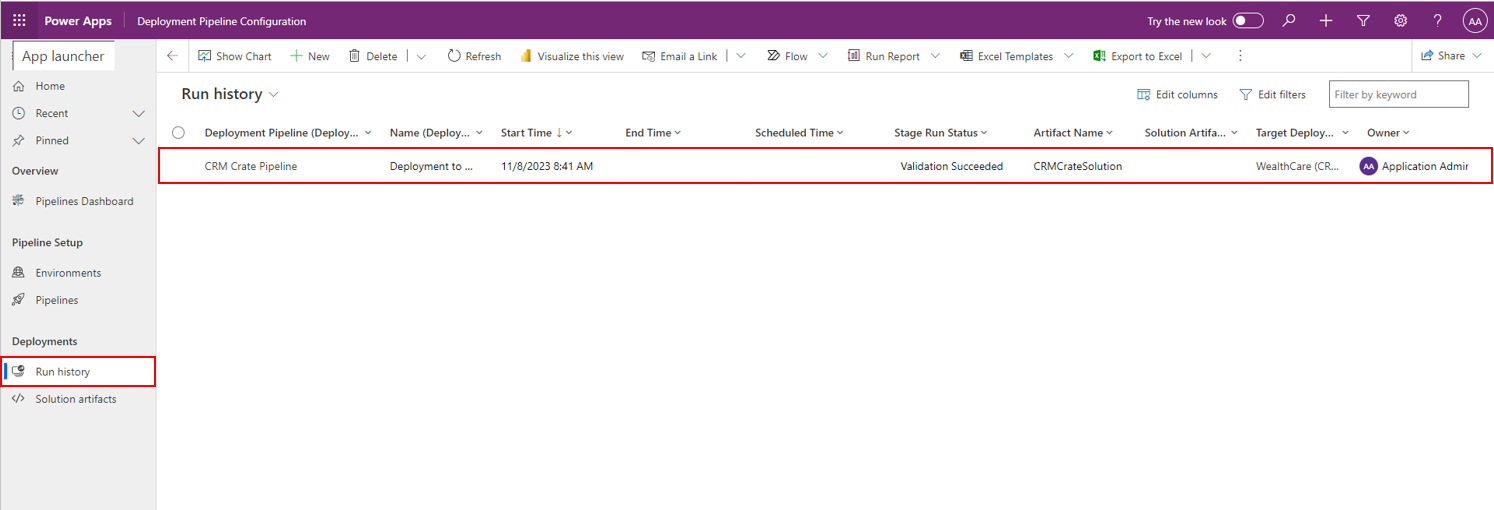
In the Power Platform Pipeline manager, choose a specific pipeline, and then opt for “Run History” to access additional details and error information in the event of a deployment failure. You can also check the pipeline run history in the Host Application as shown below.
Enhancing Pipeline based deployments with Power Automate
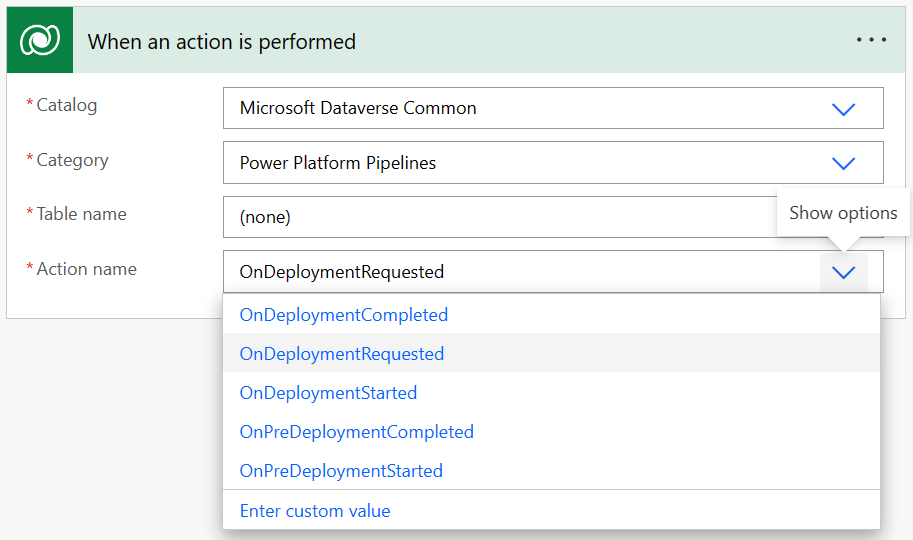
Within the hosting environment of Power Automate cloud flows, you can find triggers under the “When an action is executed” trigger of the Dataverse connector within pipelines. With this capability, you can achieve multiple features such as automated email notification to admin team when the deployment is started/failed or succeeded.
| Dataverse Connector Details | Description |
|---|---|
| Catalog | Microsoft Dataverse Common |
| Category | Power Platform Pipelines |
| Table name | (None) or Global |
| Action name | OnDeploymentRequested, OnApprovalStarted, OnApprovalCompleted, OnPreDeploymentStarted, OnPreDeploymentCompleted, OnDeploymentStarted, OnDeploymentCompleted |
In conclusion, Power Platform automated deployment offers an efficient and streamlined way to deploy, manage, and maintain solutions within the Power Platform ecosystem, enhancing productivity and scalability while minimizing manual efforts and errors.


