
We will learn to create and use a custom connector in Canvas App. Before we start, make sure to subscribe to CRM Crate so that you can stay up to date in the field of Power Platform.
What are Custom Connectors in Power Platform?
A connector is a wrapper or a proxy around an Web API that allows the downstream services to talk to Microsoft Power Apps, Microsoft Power Apps, and Azure Logic Apps. Connector provides a way for users to connect their business applications and leverage a set of pre-built actions and triggers to build their apps and workflows.
In simple words, the Custom connectors give us the ability to use our own connectors in the apps.
Why do we need a Custom Connector in Canvas App?
Microsoft provides a variety of inbuilt connectors in the Power Platform’s Canvas App. Sometimes though, you might want to call APIs, services, and systems that aren’t available as pre-built connectors. To support more tailored scenarios, you can build custom connectors with their own triggers and actions.
Create a new Custom Connector from scratch
We will create our new blank Custom Connector for our Canvas App. Follow the below steps to create a new custom connector from scratch.
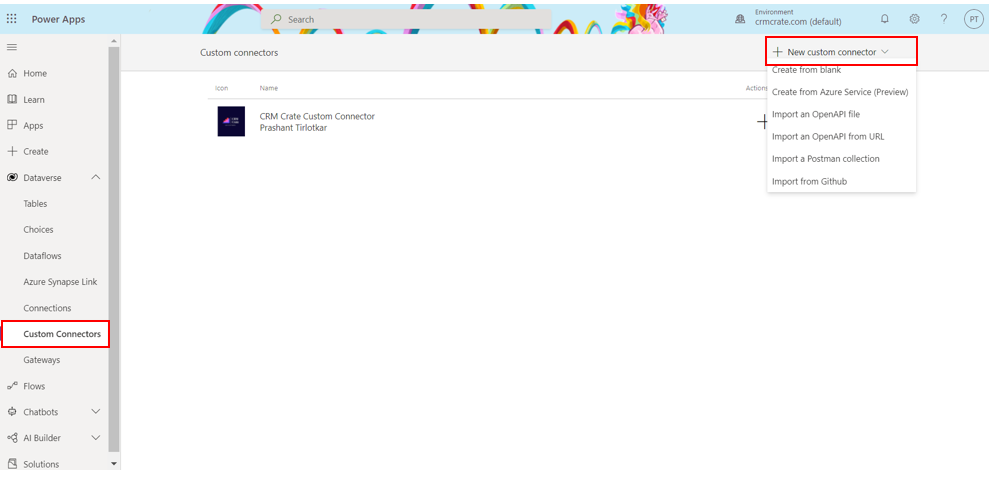
Step 1 – Create a custom connector from blank.
- Open the Canvas App studio and navigate to Dataverse >> Custom Connectors. Click on +New Custom Connector and select “Create from blank”.
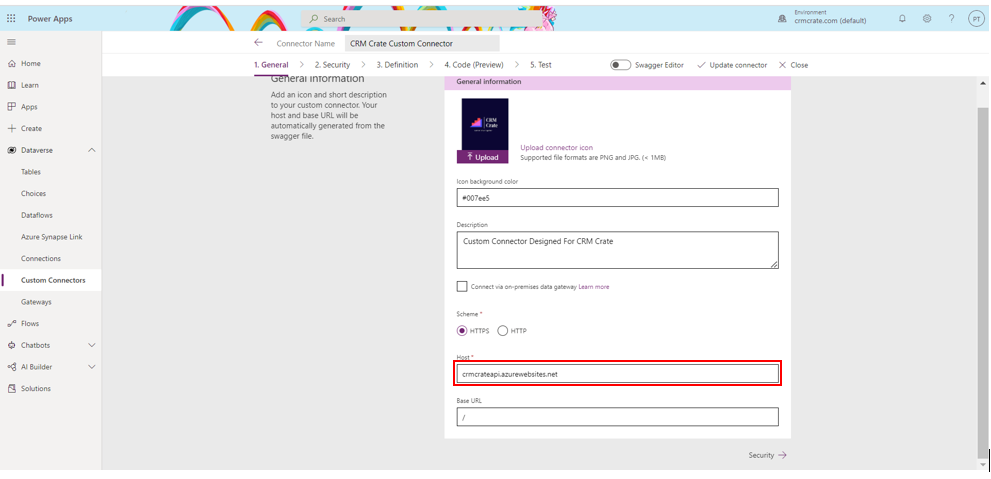
Step 2 – Custom connector’s general information.
- Fill out the basic information such as Custom Connector logo, icon background color and description as shown below.
- Enter the host address of your API service. In our case, we are using our own dedicated API service which is been hosted on Azure.
- Select the scheme as HTTPS or HTTP as per the nature of API service.
- Keep the base URL as “/”.
- Note: – Click here to learn about the On-Premise Gateway checkbox.
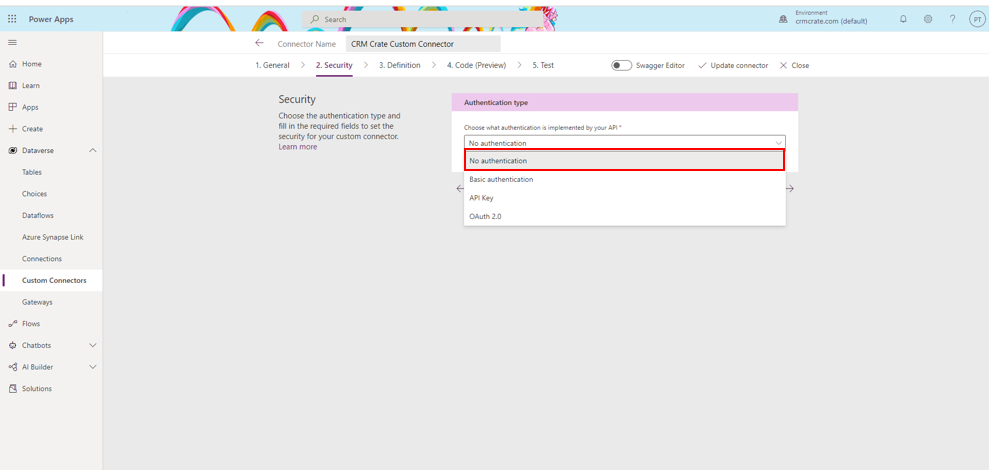
Step 3 – Specify the authentication type of your custom connector.
- There four different types of authentication types available include “No Authentication, Basic Authentication, API Key & OAuth 2.0”. For our demo purpose, we will use “No Authentication” as the authentication type.
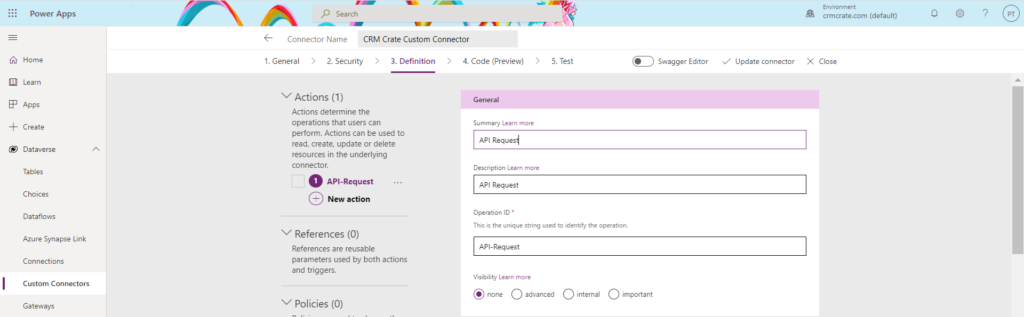
Step 4 – Create a definition for the custom connector.
- The custom connector built-in wizard provides you many options for defining how your connector functions, and how it’s exposed in the Canvas App. The connector definition covers one important aspect called “Actions”.
- For our demonstration, we will create a new action for our custom connector. This action will take two parameters in its input, one will be the “input” and another will be “executiondate”. Our custom API is been designed to perform the below actions.
- Receive request with a JSON input of type string.
- Process the two input parameters and create new rows in a SharePoint list.
- In the Definition tab, navigate to the section called “Actions” and click on new Actions. Define your endpoint API in the Action segment as shown below.
- General Section – Define your action name which needs to get populated in the connector’s action. In our case, we have created an action with Operation ID as “API-Request”.
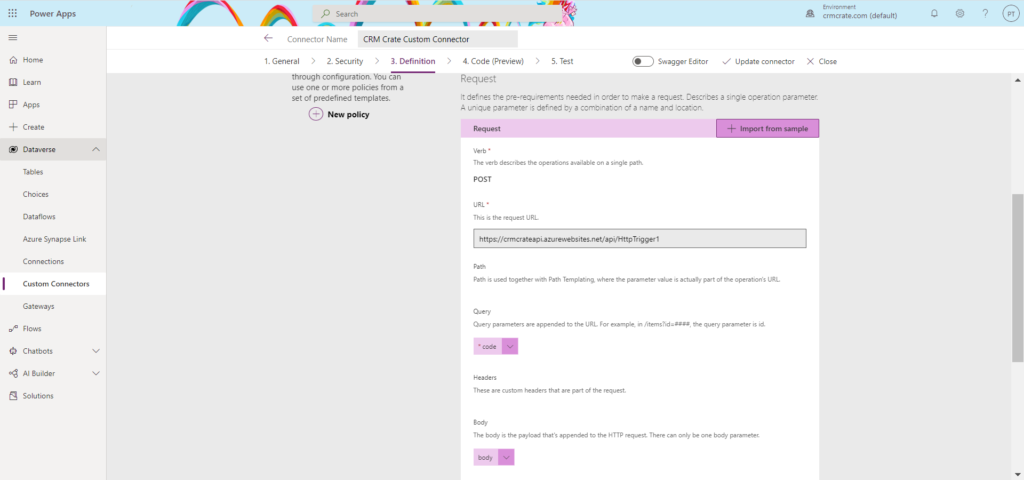
- Request Section – Define your endpoint API’s details such as API Endpoint URL, API Type, token, header and JSON Parameterized Input. For demonstration purpose, we have used the Azure Function as our endpoint API.
- Response Section – You can define a generic default response in this section.
Step 5 – (Optional) Use custom code support.
- Custom code transforms request and response payloads beyond the scope of existing policy templates. Transformations include sending external requests to fetch additional data. When code is used, it will take precedence over the codeless definition. This means the code will execute, and we will not send the request to the backend.
- You can either paste in your code or upload a file with your code. Your code must meet the following requirements
- Be written in C#.
- Have a maximum execution time of 5 seconds.
- Can’t be more than 1 MB (size of the code file).
- Click here to learn more about custom code support.
- We have skipped this stage in our demonstration.
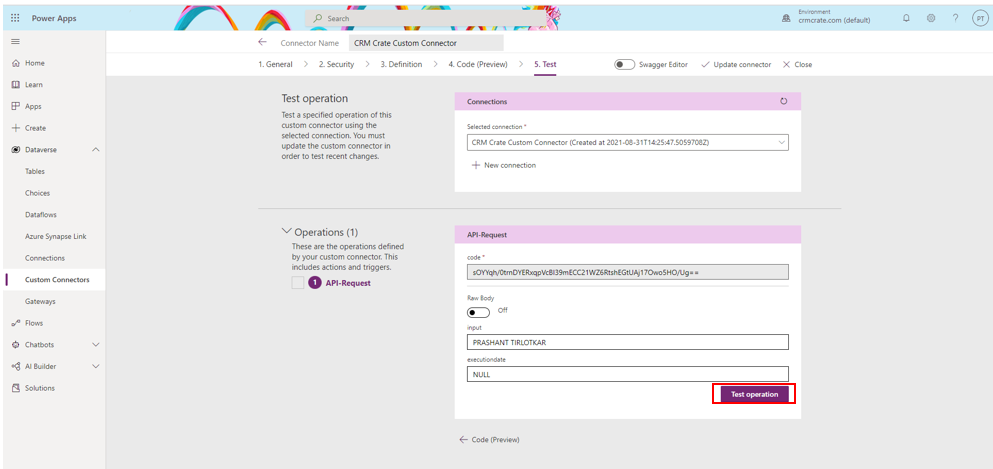
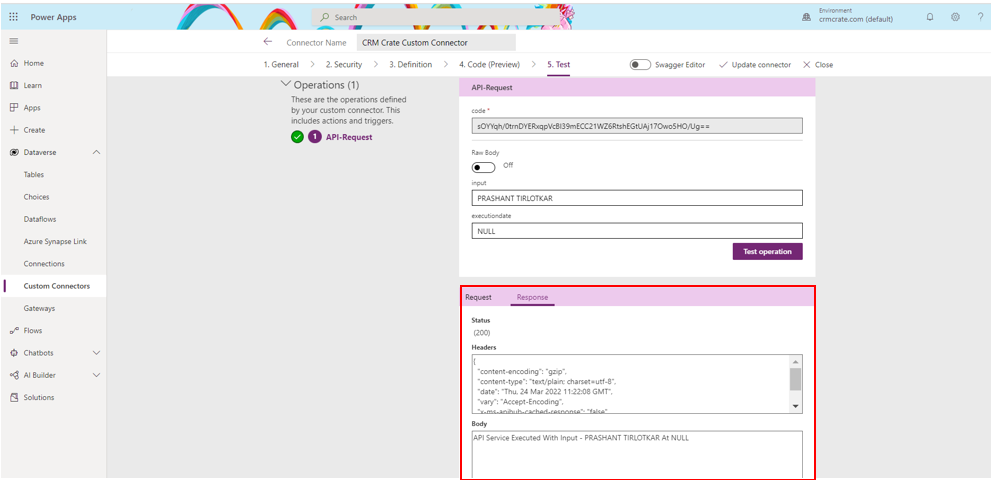
Step 6 – Test the new custom connector.
- You can test the newly created custom connector in this section as shown below.
Use the custom connector in Canvas App –
Since we have successfully created the custom connector, let us now use it in the live Canvas App.
- Open the Power Platform studio and navigate to the Canvas App in which we need to use the custom connector.
- Navigate to the Data section, click on “Add Data” >> “Connectors” and search for the newly created custom connector as shown below.
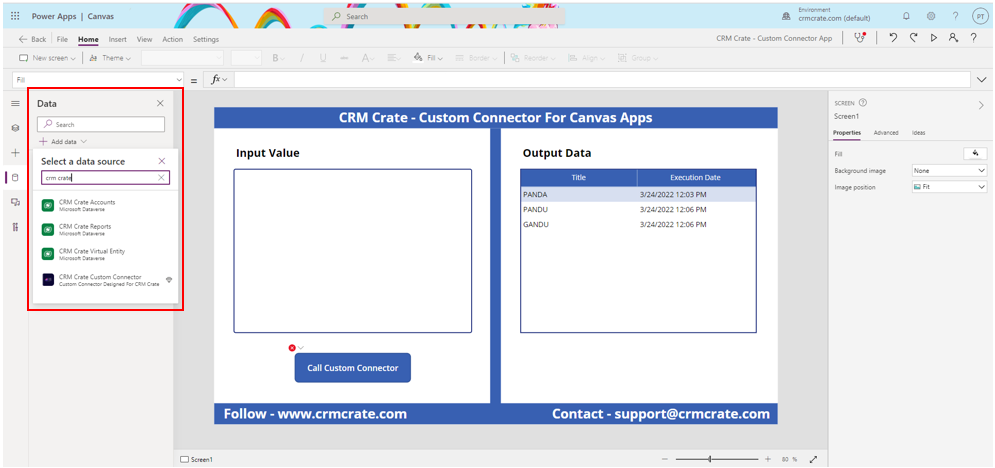
- Select and add the custom connector in the Canvas App.
- In our scenario, we have used the custom connector to receive the input parameters from Canvas App and create new items in the SharePoint list during the button click event of Canvas App.
- Therefore, the below PowerFX code is deployed on the “OnSelect” event of the button “Call Custom Connector” as given below.
CRMCrateCustomConnector.APIRequest({input:Input.Text, executiondate: Now()});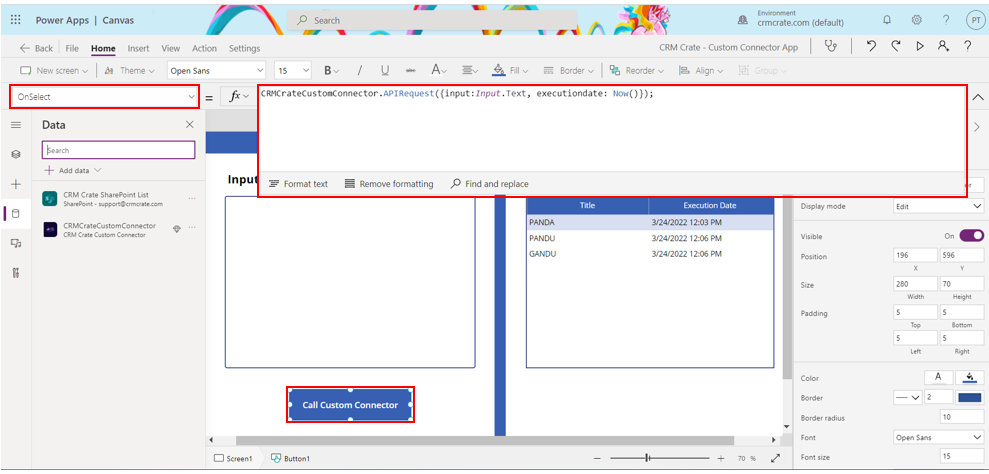
- Save and publish the Canvas App once the PowerFX code is deployed.
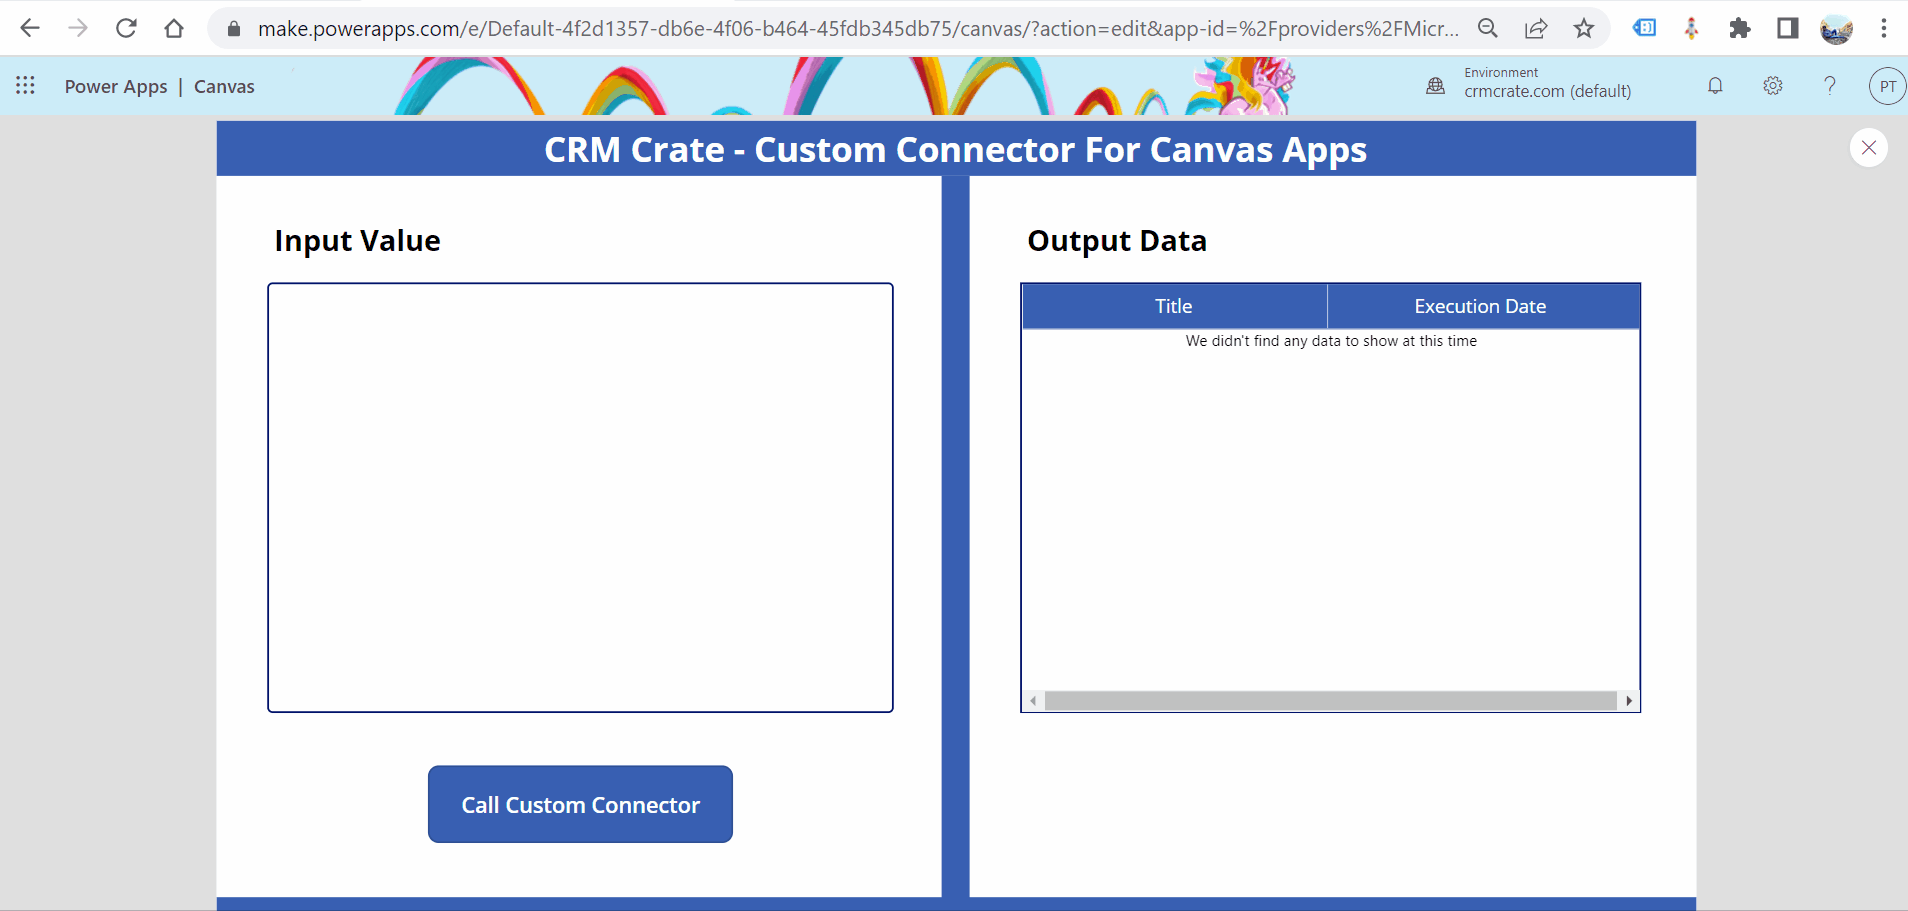
Validate the Custom Connector implementation in App preview
Play the Canvas App and validate the payload of the newly created custom connector which includes collecting the data from the Canvas App and creating new items in the SharePoint list as shown below.

Thus, we learned to create and use a custom connector in Canvas Apps.


