
In this article, we will learn to create, develop and register a custom action in Microsoft Dynamics 365 CRM. The custom actions are lesser used processes than Workflows and Plugins in Dynamics 365, but definitely are very useful in multiple business operations scenarios.
Go through the below courses to understand the out-of-the-box actions.
- What are is an action in Dynamics CRM?
- How to create an out-of-the-box action?
- What are process arguments?
- How to call an action from JavaScript using HTTP request?
- How to call an action from JavaScript using execute.online API?
- What is a custom action?

Create an out-of-the-box action
Navigate to CRM >> Settings >> Processes. Click on new Process.

Create a new process with parameters as Process Name = “Any as per your wish”, Process Type = “Action” and Entity = “None / Global”.

We will provide two parameters in our custom action, one will be a string input parameter and another will be a string output parameter.
Navigate to the Process Arguments section and add the input / output parameters.

Click on save. Now our basic action process is created in the CRM. As we discussed earlier, the custom action acts an API or interface which communicates between the CRM and your custom code. Therefore, we will have to register the custom code with our action so that we can pass the input parameter to the custom process, process it and get output from the custom code which can act as a success callback.
Create a C# class library project
Custom Actions can be created with or without writing code, but they can be triggered only by the code. Here we will a write custom code which will read Account GUID as an input parameter and give Account Number as an output parameter.
Create a class library project
Open the visual studio >> New Project >> Select type as Class Library.

Add required reference packages
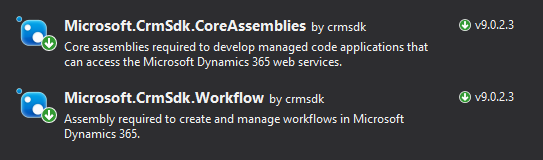
Right click on the project, navigate to Manage n=Nugget p=Packages and install Microssoft.CrmSdk.CoreAssemblies(for Microsoft.Xrm.Sdk namespace) & Microssoft.CrmSdk.Workflow(for Microsoft.Xrm.Sdk.Workflow namespace).
Method 1 – Register custom code in the action (Plugin)
We will register the custom action in form of plugins. Navigate to the project’s class library file and copy the below code.

Code –
using Microsoft.Xrm.Sdk;
using Microsoft.Xrm.Sdk.Client;
using Microsoft.Xrm.Sdk.Query;
using System;
using System.Collections.Generic;
using System.Linq;
using System.Text;
using System.Threading.Tasks;
namespace CRM_Crate___My_Sample_Action
{
    public class CRMCrateCustomAction : IPlugin
    {
        public void Execute(IServiceProvider serviceProvider)
        {
            //Initializing Service Context.
            IPluginExecutionContext context = (IPluginExecutionContext)serviceProvider.GetService(typeof(IPluginExecutionContext));
            IOrganizationServiceFactory factory = (IOrganizationServiceFactory)serviceProvider.GetService(typeof(IOrganizationServiceFactory));
            IOrganizationService service = factory.CreateOrganizationService(context.UserId);
            OrganizationServiceContext orgContext = new OrganizationServiceContext(service);
            Entity eTarget = new Entity();
            Guid eTargetGUID = Guid.Empty;
            try
            {
                //Stage 1 - Retrieving Input Parameters.
                string sInputParameter = "";
                sInputParameter = context.InputParameters["CRMCrate_Input"].ToString();
                //Stage 2 - Initializing Query Expression For Retrieving Target Forecast Records.
                QueryExpression qeAccount = new QueryExpression("account");
                qeAccount.ColumnSet.AddColumns("accountid", "accountnumber");
                FilterExpression filterR = new FilterExpression(LogicalOperator.And);
                filterR.AddCondition("ava_forecastid", ConditionOperator.Equal, sInputParameter);
                qeAccount.Criteria.AddFilter(filterR);
                EntityCollection retecR = service.RetrieveMultiple(qeAccount);
                if (retecR.Entities.Count == 0)
                {
                    //Stage 6 - Send Output Parameter As Failure.
                    context.OutputParameters["CRMCrate_Output"] = "Not Completed";
                }
                else
                {
                    foreach (var entity in retecR.Entities)
                    {
                        //Stage 3 - Process The Retrieved Account Entity.
                        Entity eAccount = new Entity("account");
                        eAccount.Id = entity.Id;
                        //Stage 4 - Update The Account Entity With Account Number.
                        eAccount["accountnumber"] = "1234";
                        //Stage 5 - Update The Account Record.
                        service.Update(eAccount);
                        //Stage 6 - Send Output Parameter After Compeletion.
                        context.OutputParameters["CRMCrate_Output"] = "Completed";
                    }
                }
            }
            catch (Exception ex)
            {
                throw new InvalidPluginExecutionException(ex.Message);
            }
        }
    }
}
Code Explanation –
- Stage 1 : Here, we retrieved the input parameter provided by the action with help of the context. In our case, the input parameter is the Account record GUID.
- Stage 2 : Since we have the GUID of account record, now we will use query expression to fetch the Account record entity object.
- Stage 3 : Map the retrieved entity object with our newly created Account entity object.
- Stage 4 : Insert the Account number by any of your desired value.
- Stage 5 : Update the retrieved Account record with value in field Account Number.
- Stage 6 : Send the success call back in form of output parameters to the action.
Register the custom action plugin code
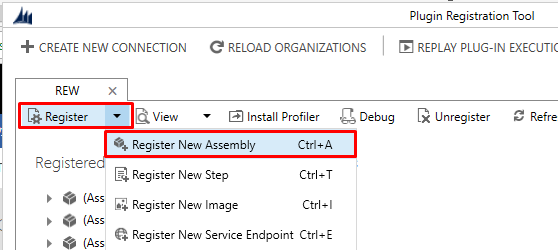
Open the Plugin Registration Tool >> Click on Register >> Register New Assembly >> Select the above created project dll file and click on Ok
Now, right click on the new plugin assembly and click on Add Steps. As we have discussed, the action are the messages which are stored in the CRM, therefore the above created out-of-the-box action will get populated in the step’s Message as shown below. Enter your action name in the field Message, configure the rest of parameters according to your functionality and click on Register New Step.

Now, your custom action is created and the custom code is registered in form of the plugin. Whenever the out-of-the-box action gets triggered, the plugin code will get automatically called and perform the operation as mentioned above.
Method 2 – Register custom code in the action (Workflow)
We will register the custom action in form of custom workflow activity code. Navigate to the project’s class library file and copy the below code.
Code –

using Microsoft.Xrm.Sdk;
using Microsoft.Xrm.Sdk.Messages;
using Microsoft.Xrm.Sdk.Query;
using Microsoft.Xrm.Sdk.Workflow;
using System;
using System.Activities;
using System.Collections.Generic;
using System.Linq;
using System.Text;
using System.Threading.Tasks;

namespace CRM_Crate___My_Sample_Action
{
    public class CRMCrateCustomAction : CodeActivity
    {
        protected override void Execute(CodeActivityContext executionContext)
        {

            //Initiating Tracing Service.
            IWorkflowContext context = executionContext.GetExtension();
            IOrganizationServiceFactory serviceFactory = executionContext.GetExtension();
            IOrganizationService service = serviceFactory.CreateOrganizationService(context.UserId);

            //Stage 1 - Retrieving Input Parameters.
            string sInputParameter = "";
            sInputParameter = context.InputParameters["CRMCrate_Input"].ToString();

            //Stage 2 - Initializing Query Expression For Retrieving Target Forecast Records.
            QueryExpression qeAccount = new QueryExpression("account");
            qeAccount.ColumnSet.AddColumns("accountid", "accountnumber");
            FilterExpression filterR = new FilterExpression(LogicalOperator.And);
            filterR.AddCondition("ava_forecastid", ConditionOperator.Equal, sInputParameter);
            qeAccount.Criteria.AddFilter(filterR);
            EntityCollection retecR = service.RetrieveMultiple(qeAccount);
            if (retecR.Entities.Count == 0)
            {
                //Stage 6 - Send Output Parameter As Failure.
                context.OutputParameters["CRMCrate_Output"] = "Not Completed";
            }
            else
            {
                foreach (var entity in retecR.Entities)
                {

                    //Stage 3 - Process The Retrieved Account Entity.
                    Entity eAccount = new Entity("account");
                    eAccount.Id = entity.Id;

                    //Stage 4 - Update The Account Entity With Account Number.
                    eAccount["accountnumber"] = "1234";

                    //Stage 5 - Update The Account Record.
                    service.Update(eAccount);

                    //Stage 6 - Send Output Parameter After Compeletion.
                    context.OutputParameters["CRMCrate_Output"] = "Completed";
                }
            }
        }
    }
}
Code Explanation –
- Stage 1 : Here, we retrieved the input parameter provided by the action with help of the context. In our case, the input parameter is the Account record GUID.
- Stage 2 : Since we have the GUID of account record, now we will use query expression to fetch the Account record entity object.
- Stage 3 : Map the retrieved entity object with our newly created Account entity object.
- Stage 4 : Insert the Account number by any of your desired value.
- Stage 5 : Update the retrieved Account record with value in field Account Number.
- Stage 6 : Send the success call back in form of output parameters to the action.
Register the custom action workflow code
Open the Plugin Registration Tool >> Click on Register >> Register New Assembly >> Select the above created project dll file and click on Ok.
Now you will find the workflow activity code which we have written above. Click on Register, now your custom workflow code is registered in your above created action.

Calling an out-of-the-box action
We have create an action, develop and register the custom code within our action in the above steps. Now will have to write a code to call our action. Go through the below links to understand the calling of actions using JavaScript.
- How to call an action from JavaScript using HTTP request?
- How to call an action from JavaScript using execute.online API?
Thus, we have learned to create an action, develop, register and call it via JavaScript.


