
You will learn to create a custom Virtual Table in Power Apps for retrieving data from an external source. Before we start, make sure to subscribe to CRM Crate so that you can stay up to date in the field of Power Platform.

Power Apps, a part of the Microsoft Power Platform, empowers users to create custom applications without the need for extensive coding knowledge. One of the powerful features within Power Apps is the concept of virtual tables. In this blog, we will learn to create a custom virtual table using data provider managed by Power App Plug-ins. Click on the below button to learn how to create a Virtual Table in Power Apps without help of Plug-ins.
This example illustrates the process of establishing a custom & personalized data provider to build a virtual table capable of performing retrieve multiple operations. To achieve this feature, generic plugins are implemented, registered using the Plugin Registration Tool, and virtual table data sources are enabled to generate the virtual table.
Understanding our Virtual Table data source
In this example, we will use our own custom data source which stores the data in text format as given below.
Indian Rupee:INR,US Dollar:USD,Australian Dollar: AUD,EURO:EUR,Pound Sterling:PND,Swiss Franc:SWF,Hong Kong Dollar:HKD,Danish Krone:DNK,Nigerian Naira:NGN,Singapore Dollar:SGDWe have our own custom web service to access this data using HTTP GET method. Below is the response of our web service in Postman application.

Further, we will retrieve the data from the above data source in Power App Plug-in and direct this data into Dataverse entities.
Register your assembly in a Power App environment
In Power Apps/ Dynamics 365, a plugin assembly refers to a compiled .NET assembly that contains custom code to extend or modify the functionality of the Power Platform, particularly in the context of Power Apps and Dynamics 365. These assemblies are used to create plugins, which are custom business logic components that can be executed in response to specific events or triggers within the platform.
Below is the Plug-in code which will fetch data from our data source using HTTP GET method and define this data in Dataverse entities. Finally, we will load all the defined entities into a EntityCollection and pass it as a Plug-in output parameter.
//CRM Crate (www.crmcrate.com)
//Demo example for Virtual Table creation using Plug-ins.
using Microsoft.Xrm.Sdk;
using System;
using System.IO;
using System.Net;

namespace VirtualDataOperation
{
    public class RetrieveOtherOrgData : IPlugin
    {
        public void Execute(IServiceProvider serviceProvider)
        {
            //Preparing Organization Service for performing Dataverse operation.
            IPluginExecutionContext context = (IPluginExecutionContext)serviceProvider.GetService(typeof(IPluginExecutionContext));
            IOrganizationServiceFactory servicefactory = (IOrganizationServiceFactory)serviceProvider.GetService(typeof(IOrganizationServiceFactory));
            IOrganizationService service = servicefactory.CreateOrganizationService(context.UserId);
            ITracingService tracingService = (ITracingService)serviceProvider.GetService(typeof(ITracingService));

            try
            {

                //Initializing EntityCollection
                EntityCollection virtualEntityCollection = new EntityCollection();

                //Fetching External Data From REST API (CRM Crate Currency Code)
                var url = "https://prod-17.centralindia.logic.azure.com:443/workflows/87ee998573a6464ba35fc9ed0a2d4f41/triggers/manual/paths/invoke?api-version=2016-06-01&sp=%2Ftriggers%2Fmanual%2Frun&sv=1.0&sig=Svv12erDlzawzGelXiSyXTGeeHbEXHl4xtdUkxVPPq0";
                var httpRequest = (HttpWebRequest)WebRequest.Create(url);
                var httpResponse = (HttpWebResponse)httpRequest.GetResponse();
                using (var streamReader = new StreamReader(httpResponse.GetResponseStream()))
                {

                    var result = streamReader.ReadToEnd();

                    //Looping Through Web Service Response Data
                    foreach (string currencyHeader in result.Split(','))
                    {
                        //Defining Entity Variable
                        Entity eCRMCrateCurrency = new Entity("cr539_crmcrateexternalcurrency");

                        int i = 0;
                        foreach (string currencyData in currencyHeader.Split(':'))
                        {

                            //Preparing Entity Object & Loading Data Into An Entity
                            switch (i)
                            {
                                case 0:
                                    eCRMCrateCurrency.Attributes.Add("cr539_name", currencyData);
                                    break;
                                case 1:
                                    eCRMCrateCurrency.Attributes.Add("cr539_currencycode", currencyData);
                                    break;
                            }
                            ++i;
                        }

                        //Adding An Entity Object Into An Entity Collection
                        virtualEntityCollection.Entities.Add(eCRMCrateCurrency);
                    }
                }

                //Passing The Final Entity Collection In Plug-in Output Parameter
                context.OutputParameters["BusinessEntityCollection"] = virtualEntityCollection;
            }
            catch (Exception e)
            {
                tracingService.Trace($"{e.Message} {e.StackTrace}");
                if (e.InnerException != null)
                    tracingService.Trace($"{e.InnerException.Message} {e.InnerException.StackTrace}");

                throw new InvalidPluginExecutionException(e.Message);
            }
        }
    }
}
Now build the assembly in Visual Studio and register the DLL in Power App environment using Plug-in Registration Tool.

Register a new Data Provider
A data provider refers to a mechanism or implementation responsible for supplying data to a virtual table. Virtual tables, within the Power Platform and Dataverse, are tables that don’t have a direct physical data source but are populated dynamically based on custom logic provided by a data provider. The data provider is responsible for handling operations like create, retrieve, update, and delete (CRUD) for the virtual table.
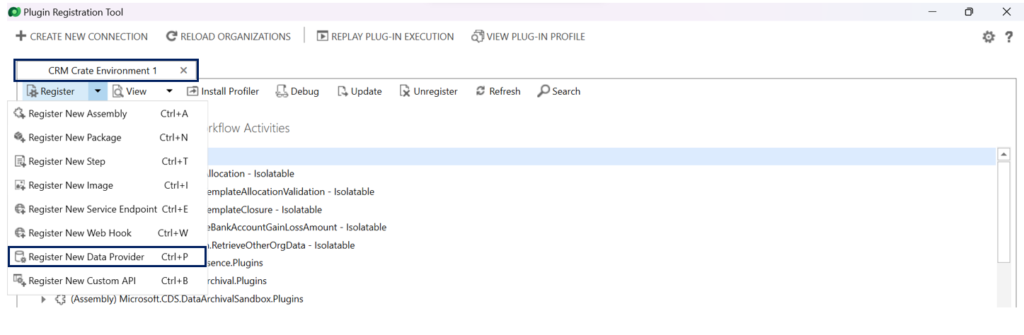
Within the Plug-in Registration Tool, select the Plug-in assembly, click on Register and select “Register New Data Provider” as shown below.
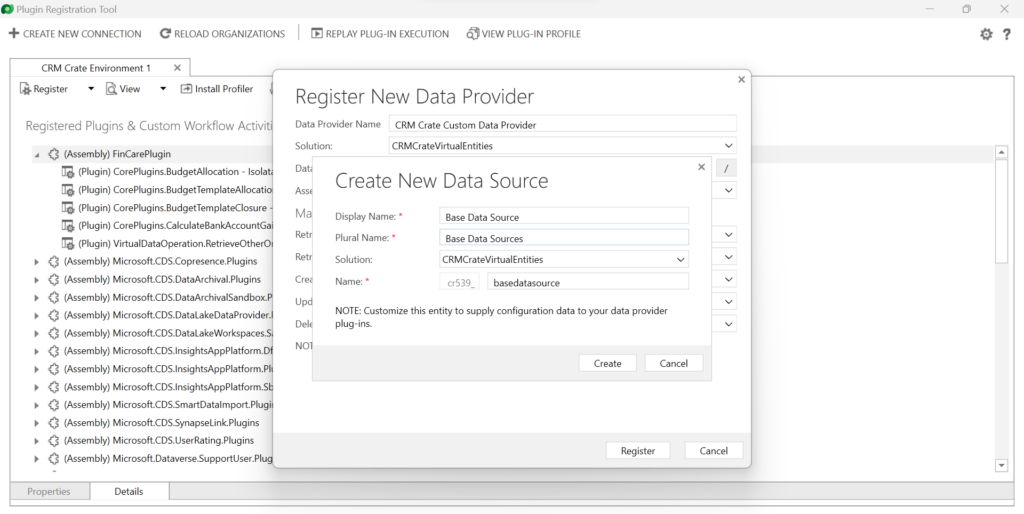
Prepare your Data Provider with the information given below.
- Data Provider Name: Name of your data provider.
- Solution: Select the Power App solution in which you want to place the Data Provider and Virtual Table.
- Data Source Entity: Here you can select either an existing Virtual Table or create a new Virtual Table.
Create a new Virtual Table using the below information.
a. Display Name: Name of your Virtual Table.
b. Plural Name: Plural name of your Virtual Table.
c. Solution: Select the Power App solution in which you want to place the Data Provider and Virtual Table.
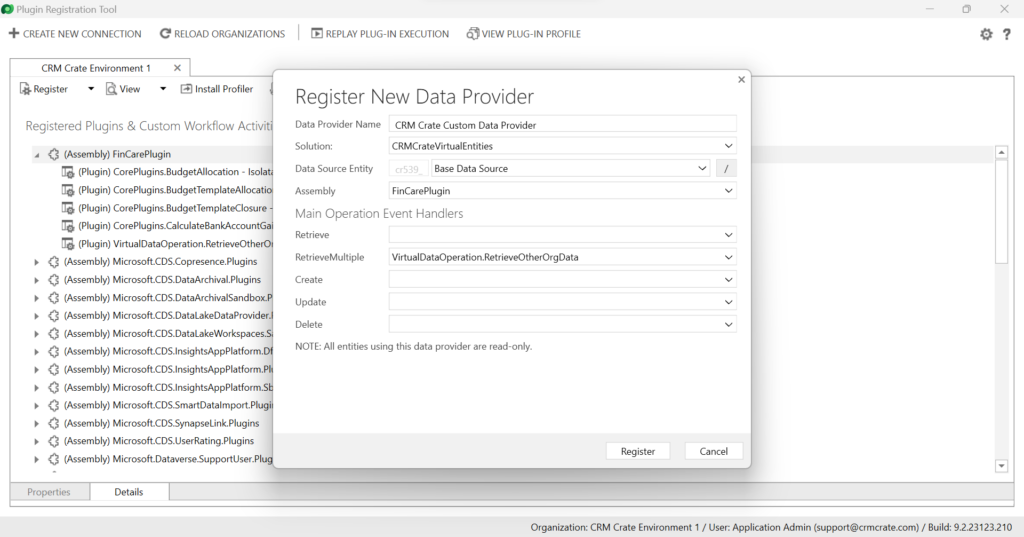
d. Name: Schema name of your Virtual Table. - Retrieve: Select the relevant Plug-in class for this message type.
- RetrieveMultiple : Select the relevant Plug-in class for this message type. We will be using this message type for our demonstration purpose.
- Create: Select the relevant Plug-in class for this message type.
- Update: Select the relevant Plug-in class for this message type.
- Delete: Select the relevant Plug-in class for this message type.
Register your Data Provider once the above configurations are completed.
Create a new Data Provider in Power App
Creating a virtual table in Power Apps involves creating a virtual entity, which is a representation of data from an external data source within the Dataverse. Below are general steps to create a virtual table using our custom Data Provider in Power Apps:
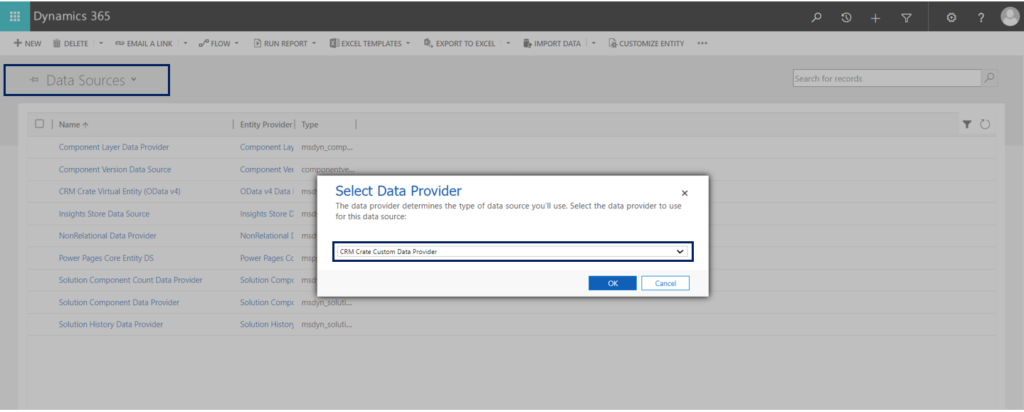
- Login into your Power Apps / Model-Driven App / Dynamics 365 and go to Advance Settings.
- Go to Settings > Administration > Virtual Entity Data Sources.
- On the actions toolbar, click on New.
- Here select the custom data provider and proceed ahead.
Create & Configure Virtual Table in Solution Explorer
Now you can create your own new Virtual Table in Power App and configure its key attributes as given below.
| Field | Description |
|---|---|
| Data Source | Select the OData v4 Data Provider data source |
| External Name | Enter the name of the table in the external data source this table maps to |
| External Collection Name | Enter the plural name of the table in the external data source this table maps to |

Further you can create / update the table attributes according to your Plug-in structure. We have created a new field named “Currency Code” to store the currency code provided by our Plug-in Data Provider.
Test out the data of newly created Virtual Table
You can try to test your virtual table data by querying it in Power App as shown below.

In conclusion, the adoption of virtual tables in Power Apps presents several compelling benefits, enhancing the overall efficiency and flexibility of data management within the Power Platform. These advantages contribute to a more dynamic and tailored user experience while simplifying development and maintenance processes.


